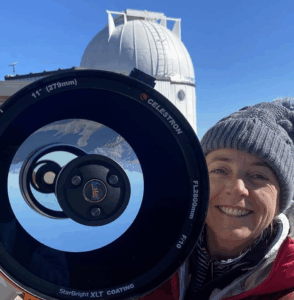
Jan Erik Vallestad is an astrophotographer based in rural Norway, where his connection to the night sky began as a child. He started his astrophotography journey in 2022 and quickly grew from a simple star tracker to running multiple automated setups from his own backyard. Rather than chasing quantity, Jan focuses on a few meaningful projects each season, taking the time to fully explore and understand every target he captures. For him, astrophotography is not just about the final image—it’s about the process, the patience it requires, and the moments of calm and connection found under the stars.
How It All Began
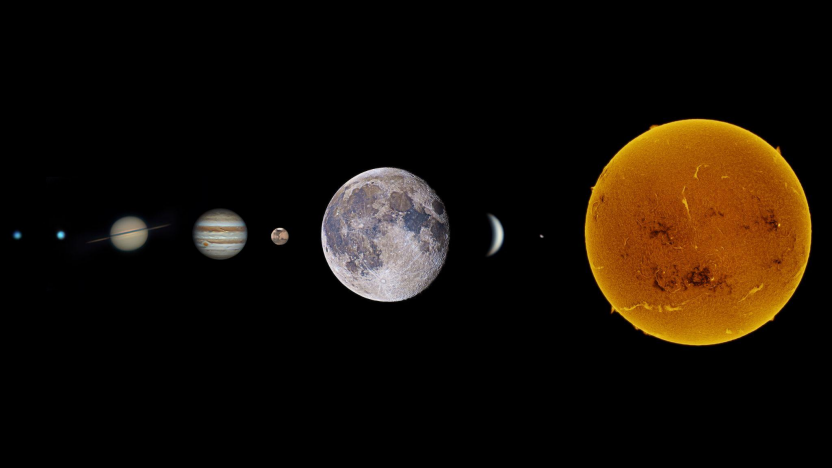
For me it probably all began when I was a kid. Growing up in a rural bortle 2 area I always felt curious and mesmerized about the night sky. I remember spending time laying in the snow just looking up, wondering what it all was. Lately I’ve been using my 8” SCT to capture our Solar System and exploring space as often as I can.
Our Solar System, captured from my backyard; ASI678MC/678MM paired with a Celestron Edge8 HD and Acuter Elite Phoenix 40 H-alpha telescope. The Moon was captured using my Nikon Z7.
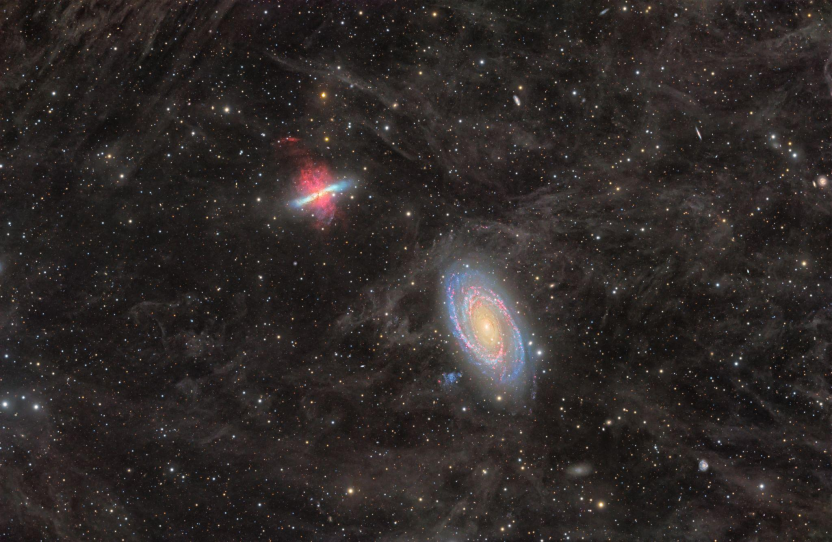
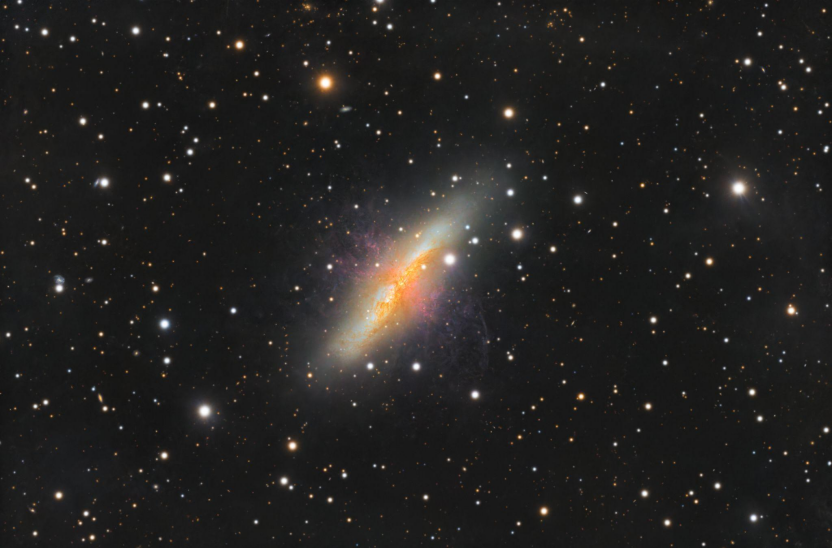
As I got older I got into terrestrial photography and restoring old photos. However it wasn’t until 2022 that I got my first star tracker on a whim after seeing some inspiring photos, one of those being my favourite object (M82) which led me to do my own deep integration later on. I mentioned this project about two years ago when I had my first ASIWEEK win, and finally here is the update 🙂
M81/M82: A 229 hour exposure that took almost an entire astro-season to capture and a month to complete in post processing. Captured with my ASI2600MM, AM5, Esprit 100ED and Antlia LRGB/Ha filters.M82: A 45 hour exposure with my ASI2600MC, Celestron Edge 8HD and AM5 (no filters)
Since I first saw it I’ve been mesmerized by M82. It’s a galaxy in chaos – packed with super clusters and powerful hydrogen alpha outflows blasting into space. Few objects show such bursting star formation with such raw, dramatic structure, at least ones that are of such a large apparent size to us.
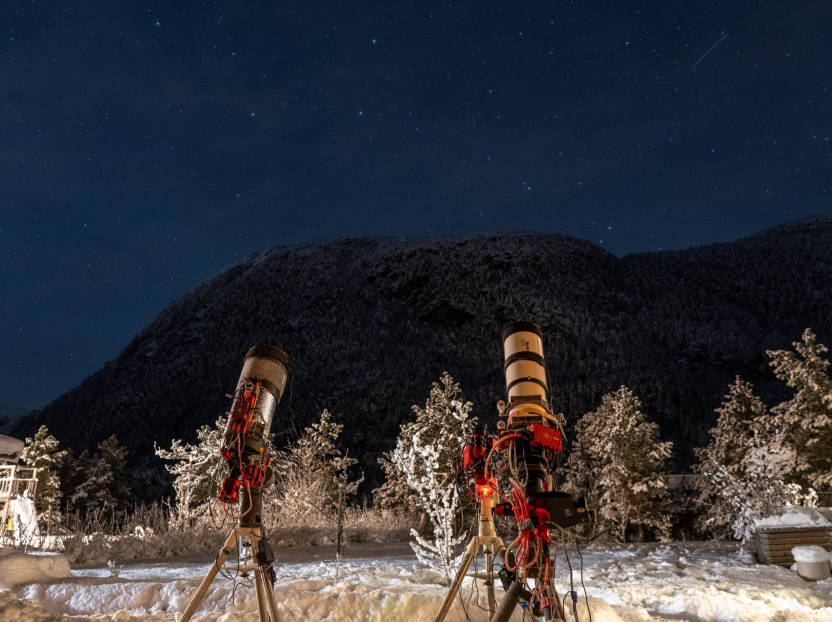
The Setups
By now I have three automated rigs that I use every chance I get, as well as the star tracker that started it all. I began with my fullframe DSLR but swapped to dedicated cameras after a few months. I use a range of different cameras but mainly the 2600MM/MC and 585MM PRO. Though I also use my 678MC/MM cameras from time to time as they are more than capable of creating great images.
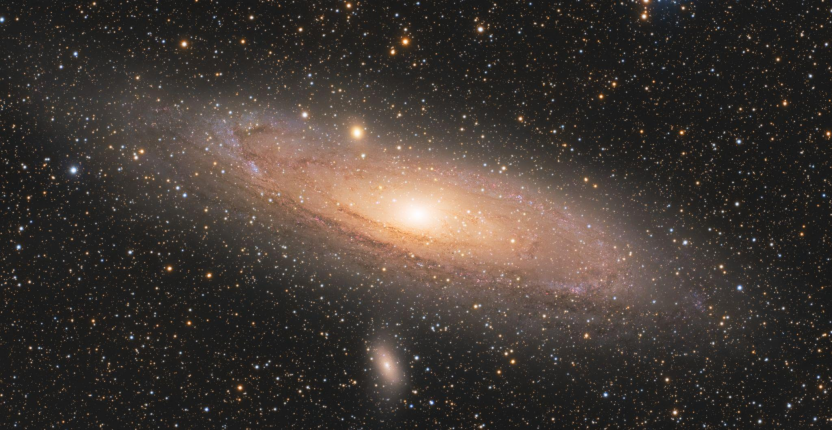
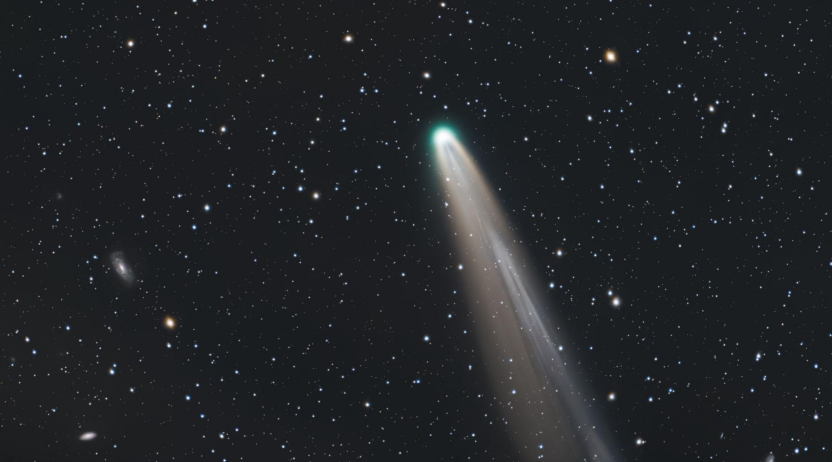
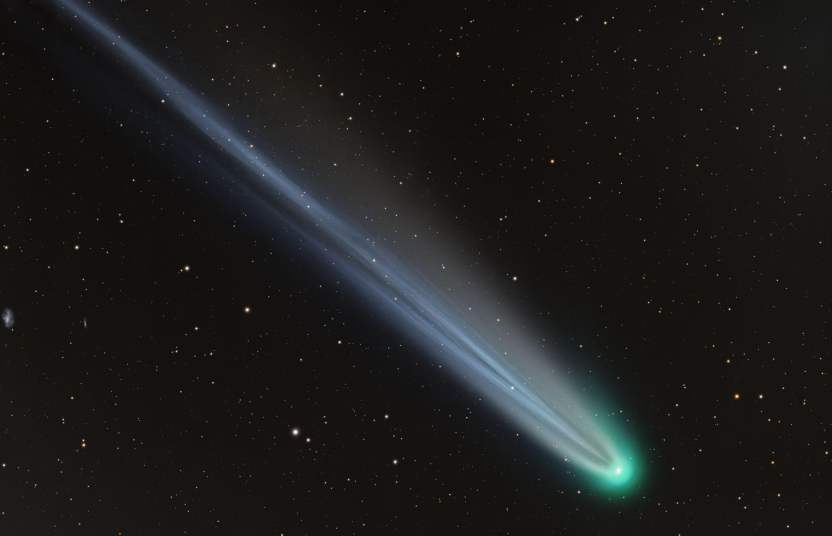
M31 captured with my 678MC paired with a Samyang 135mm F/2 lens on a Sky-Watcher Heq5 PRO. Total exposure length is 25h 41m made up from 30s sub-exposures. This image captured the nova AT2025abao in great detail as it increased and faded in strength.Comet C/2025 A6 Lemmon: Captured with my ASI678MC paired with my Samyang 135mm F/2 lens. 34m 30s of total exposure (30s sub-exposures).
My setup has evolved quite a bit over time and although I consider most of my equipment invaluable at this point I think I would have to point out the brain behind it all: the Asiair. It connects everything and makes it a lot easier to get into astrophotography purely because of its simplicity in use. The step up from a laptop to the Asiair was game changing for me. Being able to automate everything, virtually without any hassle, allowed me to spend more time doing what I really wanted to do.
Under the Stars
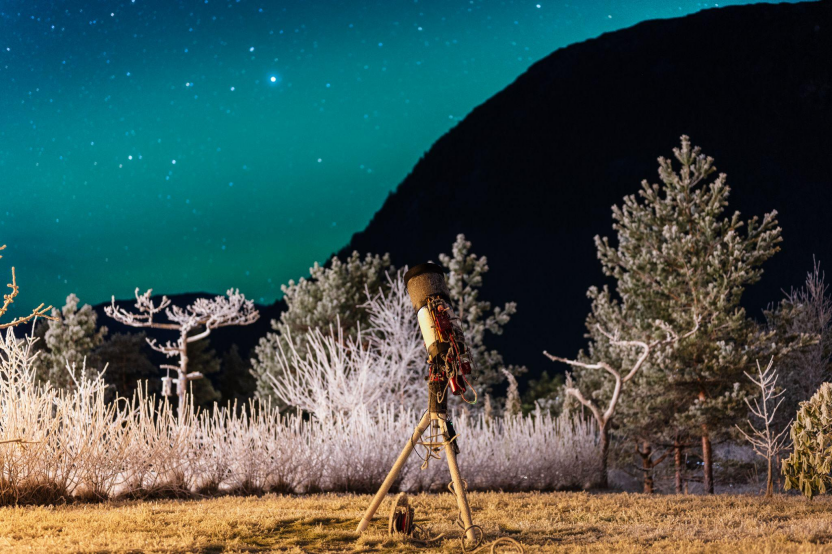
I live in a relatively rural area in Norway under B3-3.5 skies, but only half an hour away from B2. However, artificial lights/light pollution is sadly steadily increasing and I expect to be closer to B4 before too long. I always do my imaging from my backyard as I prefer to be hands-on, it also makes it possible to combine with family life as I don’t have to miss anything. I don’t think I could enjoy it the same way by doing it remotely, despite getting many more clear nights, as I would feel too disconnected from it all.
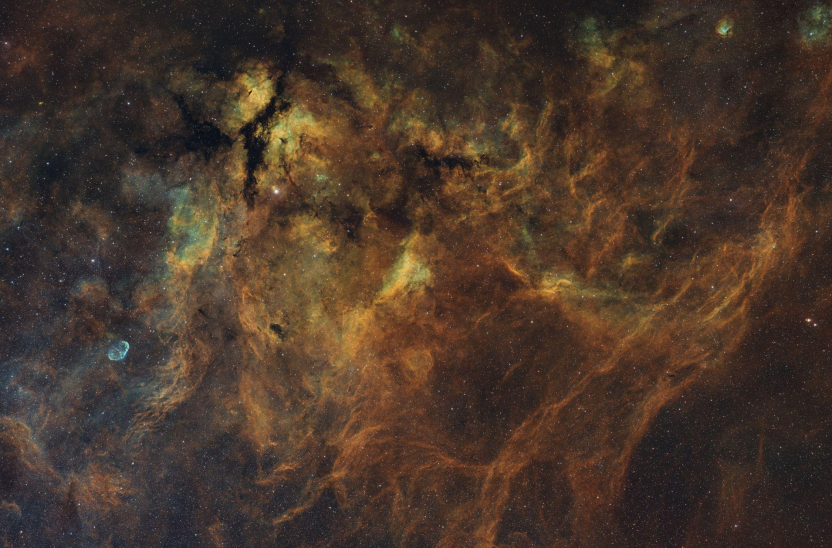
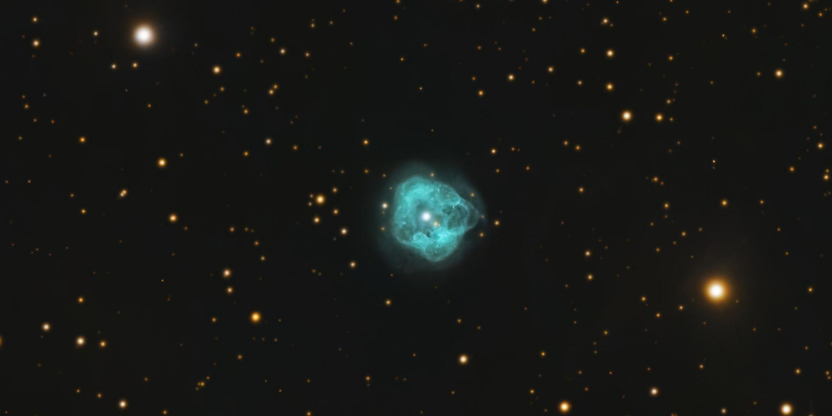
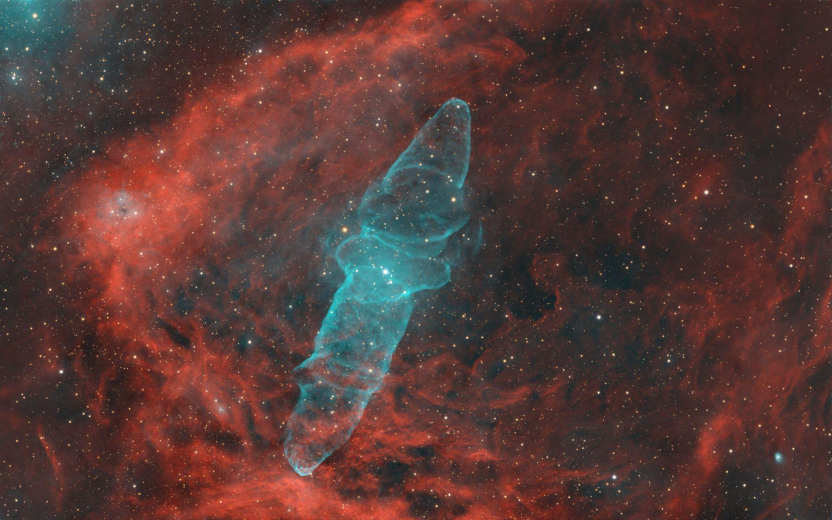
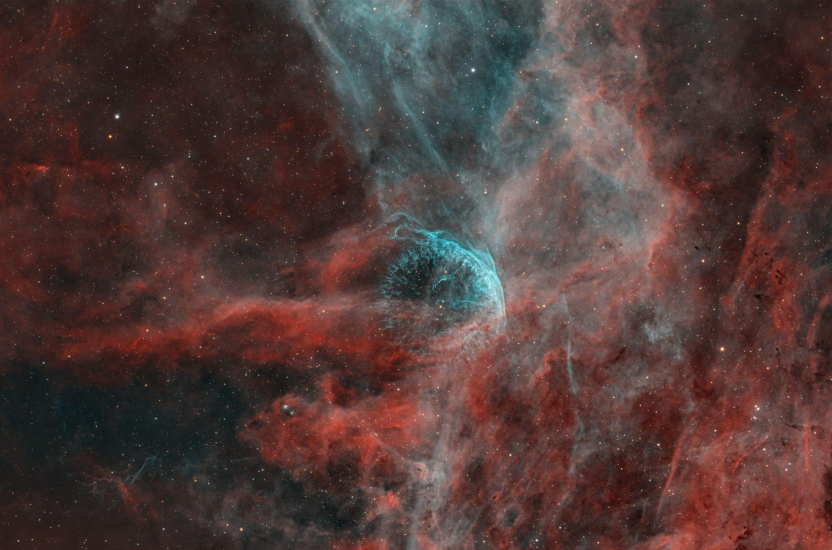
Sadr region, Cygnus: A 12h 10m exposure with dual Samyang 135mm F/2 lenses paired with ASI2600MM/ASi2600MC, a Antlia 3nm Sii filter and a Scorpio 5nm Ha/Oiii filter.NGC 1514: A planetary nebula called The Crystal Ball Nebula. Captured with my ASI2600MC, Edge 8HD and AM5 (no filters). A total exposure of 3h 56m 40s (710x20s).
Doing everything yourself from home also provides special moments you can appreciate. I can include my kids and family in a more practical manner, and it’s a way of de-stressing out in the fresh air after long days. Especially during winter when the snow is laying thick on the ground, dampening every sound. Spending that time to slow down a bit and simply look up provides a certain peace of mind and sense of awareness that I really appreciate.
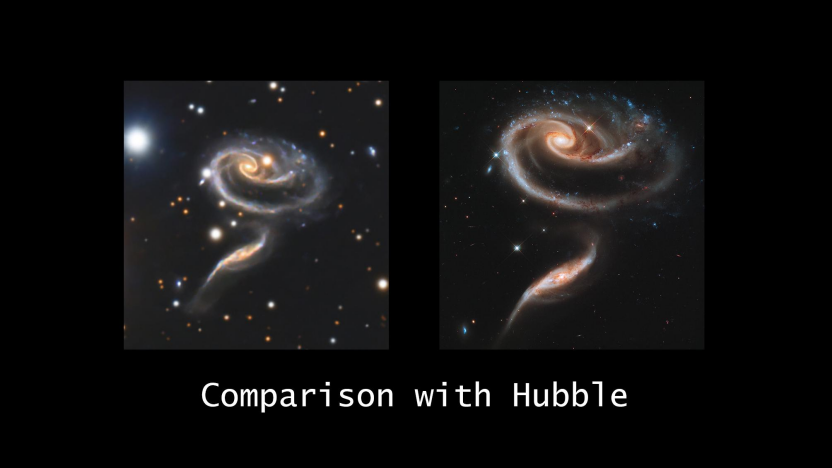
SNR G150.3+4.5: Part of an ancient supernova remnant surrounded by dark nebulae. I used my ASI585mm PRO, Heq5 Pro, SvBony SV555, Touptek LRGB filters and Laida 5nm Ha/Oiii filters. Total exposure: 55h 35mArp 273: A comparison image I created from my own Arp273 image and the one captured by Hubble. My image was captured using my 2600MC, Celestron Edge 8HD and AM5 (no filters). The image has a total exposure of 19h 21m.
Astrophotography wise I think the most thrilling objects have to be comets. They provide a bit of adrenaline rush to astrophotography. You can plan all you want, but if everything doesn’t come together at the right time then the opportunity quite certainly won’t come again as they often move through our Solar System only once in our lifetime. In contrast to DSO’s they move quickly, change rapidly and make for spectacular images and GIF’s. The thrill of actually “completing” a comet is quite special.
C/2025 A6 Lemmon: Captured with my ASI2600MM, Esprit 100ED and Antlia LRGB filters (Exp: 1h 18m).
C/2025 K1 ATLAS: Imaged with my ASI2600MC, Celestron Edge 8HD and AM5. One hour of total exposure as the comet was disintegrating on its way out of our Solar System for the last time.
The Challenge
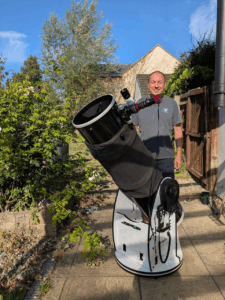
The most apparent challenge I’ve had was while transitioning from refractors to SCT and long focal length imaging. Several times the tube filled with condensation despite using dew heaters, I’ve had unexpected snow laying on the corrector plate, frost building up inside the dew shield and more. Though imaging and collimation was simple and working well, issues with my climate and handling the larger diameter tube/glass proved difficult.
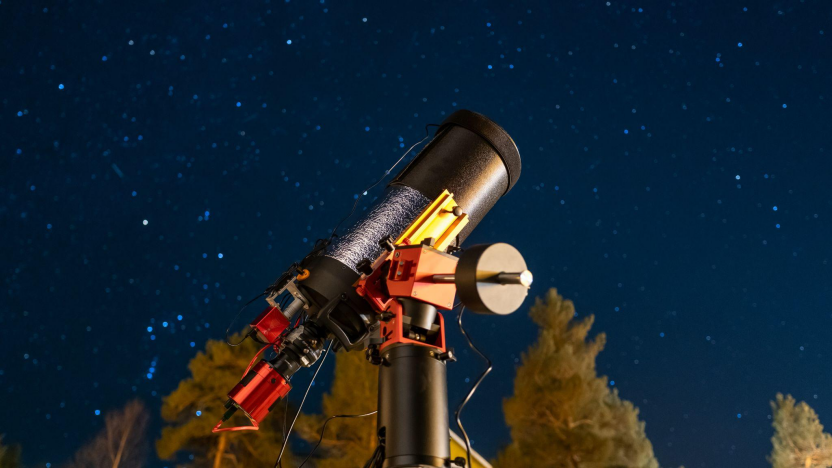
Celestron Edge 8HD SCT modified to handle the challenging climate, sitting on top of my trusty AM5.
Luckily we have a very good community and I receivedhelp finding necessary counter measures to modify the telescope and it’s now flawless in all conditions.
Arp 214: Captured with my Edge 8HD and ASI2600MC (no filters) . Exposure length: 40h 56m.
Like most I started by trying to image as many objects as I could rather than focusing on getting the quality images I would be happy with. Over time I’ve grown to prefer getting a few good images every season rather than a lot of images I might not be content with. So I’d say that the biggest lesson I’ve learned since I started is patience.
NGC 7023: ASI2600MC, Edge 8HD and AM5 (no filters). Exposure length: 11h 56m.Sh2-162: ASI2600MC, Edge 8HD, Am5 (no filters). Exposure length: 63h 36m.
The Processing
I only process my images once but that one time will take a long while. Sometimes hours, sometimes days or weeks. During this process I will re-start several times, have long breaks and make changes as I go. Every single object is different and has its own challenges. This way I find I get the most out of each image, and they all get their own unique signature.
Normally I stack my images in Pixinsight after each session to get a handle on SNR and if I’m happy to move on to the next filter or my next target. Once I’m happy with the initial SNR I will start further processing. I usually do a set of processes in a certain order depending on whether it’s mono or color, but apart from those steps my images are always processed differently which is also part of the challenge for me. It’s not about finding one way adapted to everything, rather adapting myself to tackle each new challenge.
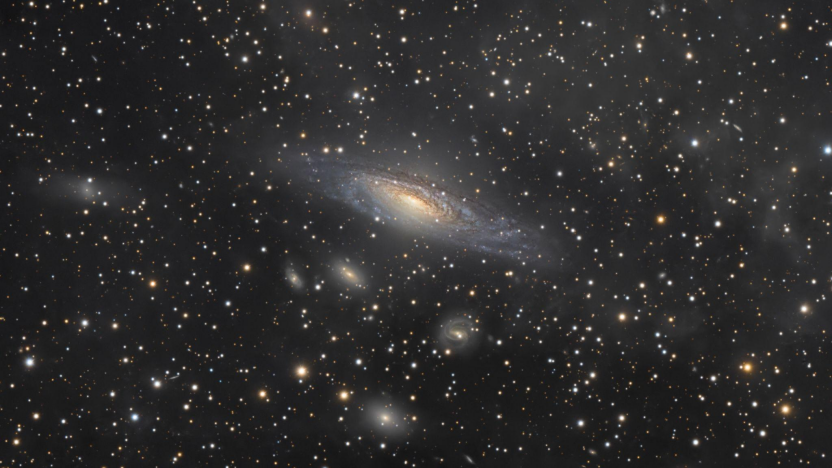
NGC7331 + SN 2025rbs: ASI2600MC, Edge 8HD and AM5 (no filters). Exposure length: 17h 22m
Basic workflow:
OSC: Color calibration > gradient removal > deconvolution > star removal > histogram stretching and applying curves individually > additional sharpening/wavelets > denoising and making final touch ups > re-integrate stars.
Mono broaband: Gradient removal > RGB combination > color calibration > deconvolution > star removal > histogram stretching and applying curves > additional sharpening/wavelets on starless image > LRGB combination > denoising and final touch ups > re-integrate stars.
Mono narrowband: Gradient removal > deconvolution > star removal > histogram stretching and applying curves > additional sharpening/wavelets on starless image > NB palette combination in pixelmath > denoise and final touch ups – re-integrate stars.
These steps are pretty basic and there are a lot of more involved steps in between the lines in both Pixinsight and Photoshop. The way I do things have evolved a lot over time as I spent time learning the software, what the different processes do, how to apply them, when it’s best to use them and perhaps most importantly: When it’s best not to use them. Patience is key in this hobby. I believe that spending time learning the software in which the final images are created is crucial. By equipping ourselves with the answers to how and why, all processing becomes a lot more intuitive. Apart from the actual data collection and image post processing I probably spend the most time researching the objects I image. Mostly because I want to learn but also because it makes each image that much more meaningful to me. I treat each object as a personal discovery as I photograph them. There are many invaluable sources of information that are very useful for this purpose, everything from wikis, various databases to NASA. I primarily use my Astrobin page to publish/post my write ups along with detailed images/descriptions.
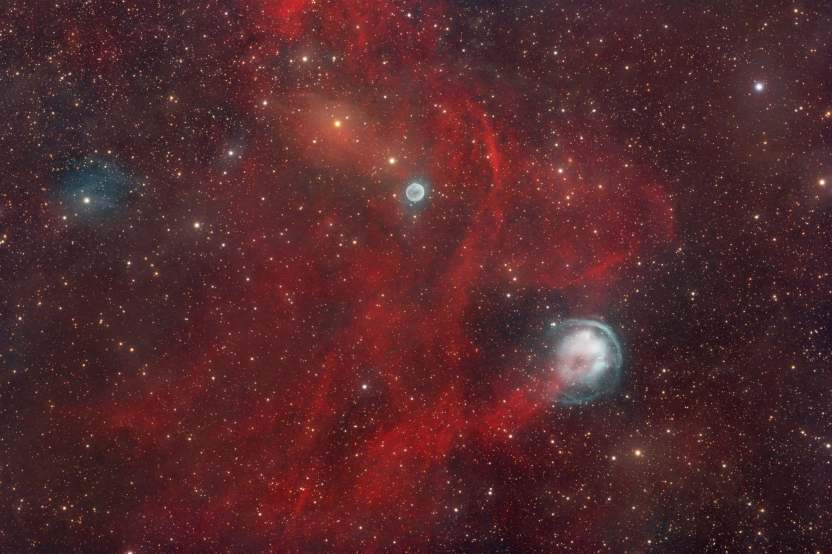
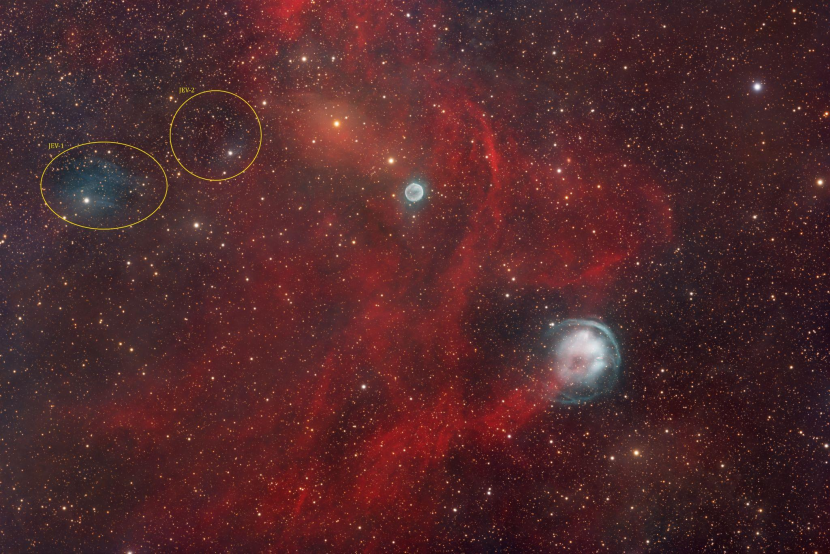
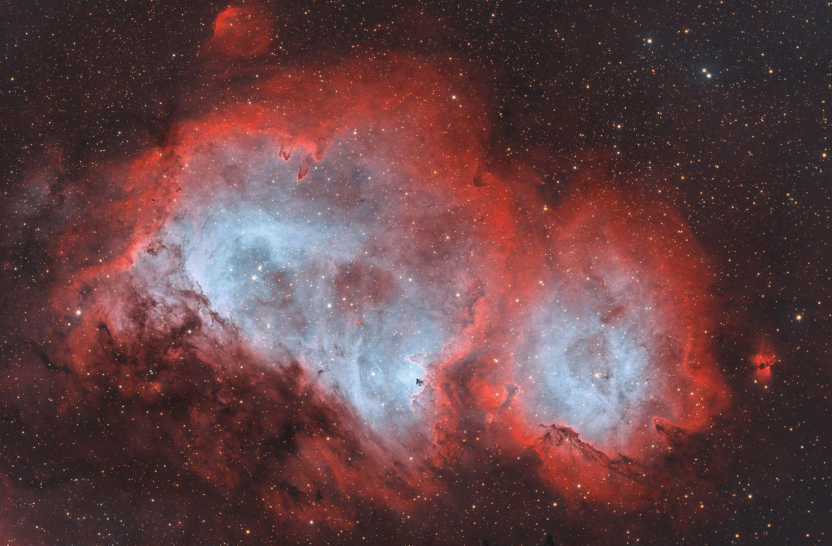
I’m lucky enough to have several projects that I’m very proud of but I’d have to highlight my most recent ASIWEEK image as it contained a lot of elements, some of which were very special to me as I discovered two apparently uncatalogued reflection nebulae.
My ASIWEEK image “Two uncatalogued Reflection Nebulae (JEV-1 & JEV-2) + PN & minor planet in Cassiopeia”: The total exposure is 106h 47m. I used my ASI2600MM and Esprit 100ED paired with Antlia RGB and Ha/Oiii filters.
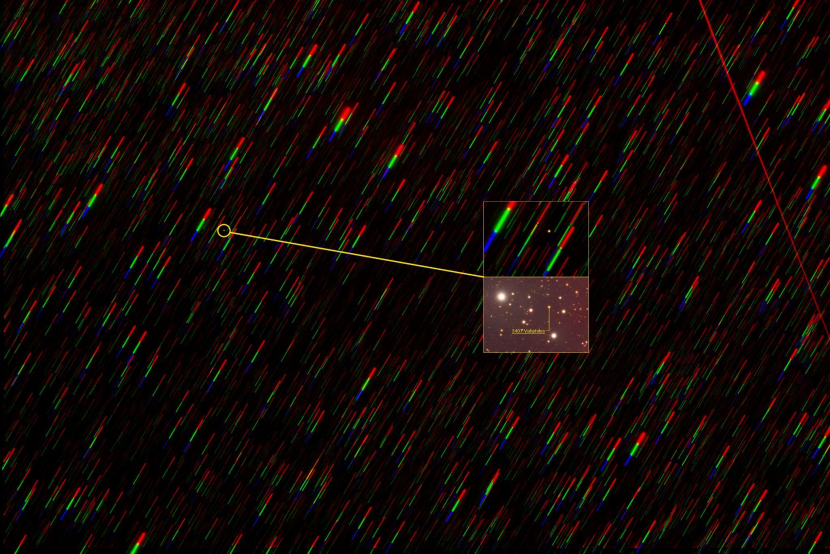
The initial idea was to image the two planetary nebulae Abell 6 and HFG-1 which I had planned for quite some time. I almost even changed my orientation at one point which would have made me miss the further discoveries in this image.
First I came across a fast moving object too big to be rejected in stacking, strikingly similar to a comet which I initially thought it to be. After much time spent on checking I finally came across the answer using MPChecker. Enveloped in the hydrogen alpha region there was an orbiting minor planet, 3401 Vanphilos. A very happy coincidence and testament to the science we may contribute to while imaging from our backyards, as well as the importance of studying the data we collect. Furthermore, I discovered two patches of faint blue reflection nebulae which intrigued me to find more. To my surprise these appeared to be two very faint, and previously uncatalogued reflection nebualae hidden deep within the hydrogen signal.
After peer reviewing among other photographers and the Deep Sky Hunters collective, I chose to designate these as JEV-1 and JEV-2 for identification purposes.
The Vision — Looking Ahead
My astro-season is coming to an end here in Norway as darkness fades away. Astronomical darkness is gone from about late April to mid August. Apart from doing solar imaging this period gives plenty of time to plan and make changes for the upcoming season though, so I am looking forward to making target lists. I have a few goals planned out, as I want to continue “collecting” galaxies from the Arp catalogue.
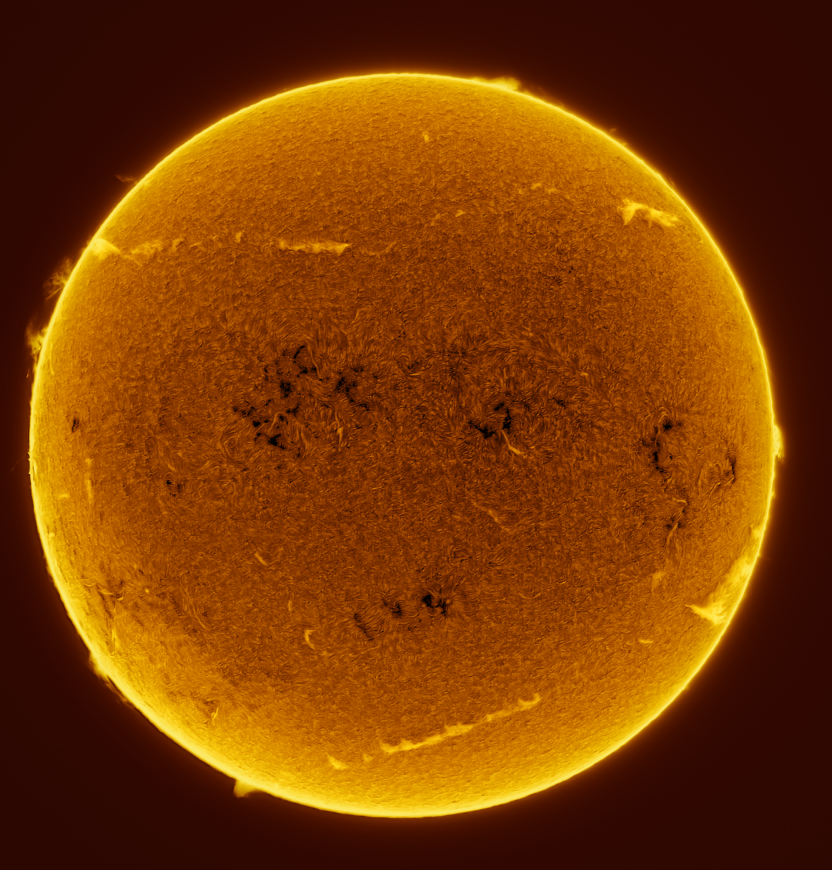
The Sun: ASI678MM, Heq5 Pro and Acuter Elite Phoenix 40 H-alpha solarscope. 197x5ms
My long term plan is to build my own home-observatory so that I may safely store all my equipment outdoors and save me the extra work of setting up every rig each time. Short term goals include getting my hands on some new mono filters for the lightweight setup to start capturing planetary nebulae next season.
The Connection — ZWO in My Journey
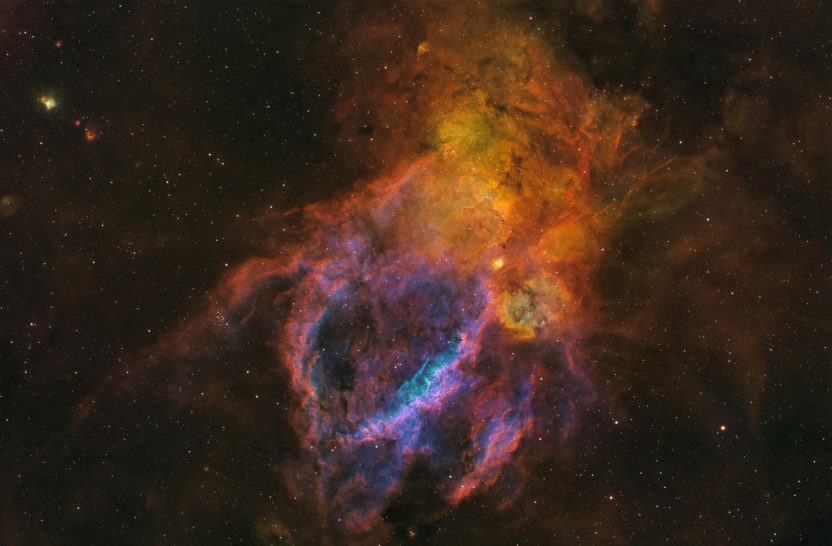
ZWO has played a major part in my journey by enabling me to do what I love and aspired to without the hassle of complicated setups and components. When starting out the Asiair unit alone made the countless challenges a lot more easy to overcome. It gave me a kickstart of sorts. I’m still relying on my (now three) Asiair units and have built all my setups around them, and honestly I wouldn’t change.Sh2-199: ASI2600MM, Esprit 100ED, Antlia RGB + Ha/Oiii filters. Exposure length: 44h 15m
Every upgrade I’ve made has had an impact on both my results and my enjoyment. The AM5 provided me with a simpler setup, the sensitive sensors made it possible to capture the best data, EFW/EAF’s has made collecting continuous good data troublefree, and last but not least the Asiair automates everything.
—— “Even though astrophotography is often considered a ‘solitary’passion, it is in fact very social when others help you through the toughest moments.” Hello, my name is Paweł Radomski, I
“I can say that it all started from there.” Giacomo’s connection with astronomy began early. “I’ve always been passionate about the sky since I was a child,” he recalls. At
My journey into astrophotography began in 2020, during a time when I wasn’t very confident with computers. I remember joining online astrophotography communities, full of hope and questions—but instead of
The International Space Station has been my favorite target since I started astrophotography five years ago. Even though my conditions aren’t ideal—I live in a light-polluted area surrounded by trees,
Beginnings in Astrophotography Konstantinos Beis has always been fascinated by the night sky. After moving to a rural area in 2017, where the Milky Way was clearly visible, his passion