

Discovery of the M31 [OIII] emission arc
Recently, a major discovery by an international team of amateur astronomers and scientists has become a huge online hit, and this new discovery is just located in one of the
For a long period of time, astrophotographers have to face the dilemma between spending a long time flattening the steep learning curve of astrophotography and just giving up to let go. The software too complicated to start with, the tedious imaging settings and post processing and so many other problems are what astrophotographers deal with each time when they are involved in a new astrophotography project.

Yet all the processes can get simplified by ASIAIR. You may know ASIAIR as a good image tool before – it can do polar alignment, plate solve, focusing, autoguiding, GOTO, autorun and other features with ease. However, ASIAIR can actually do much more than above now. With the new version 2.0, you can stack your planetary and deep-sky targets and quickly process them on your phone – bye bye laptop!
Here we’d like to introduce you how to use the stack function of ASIAIR.
As always, connect your phone to the ASIAIR WiFi and then launch the ASIAIR APP. If you take a closer look, you’ll notice that the v2.0 interface has changed a lot. The UI design and layout have been easier for users to understand and much more friendly for night work.

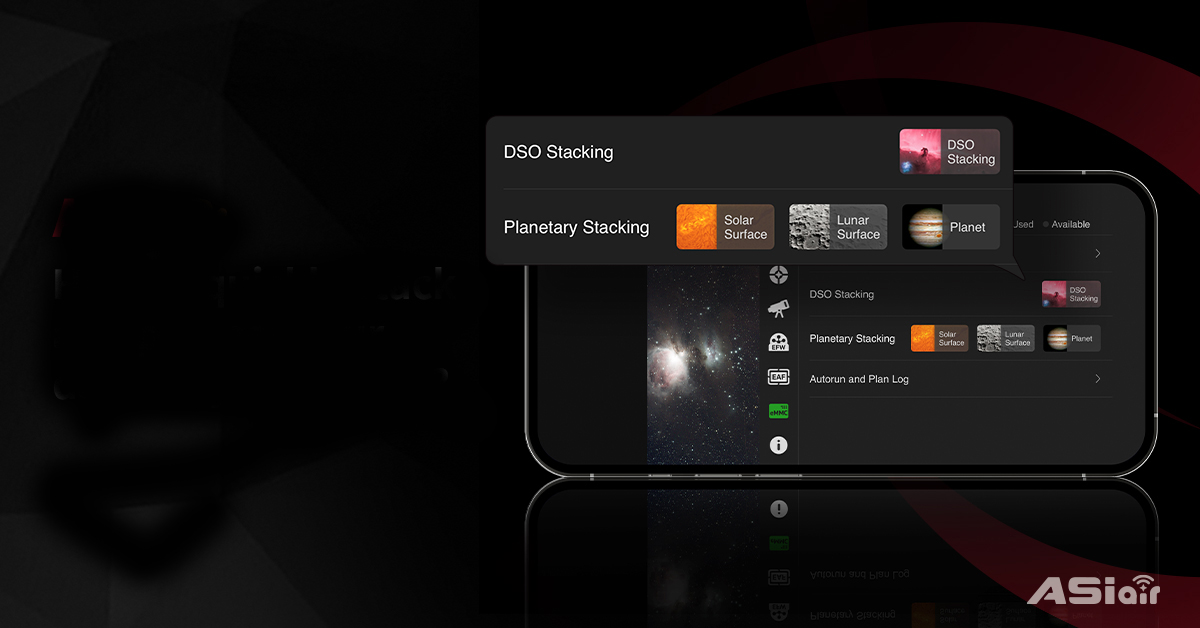
Go [File Manager], you may see [DSO Stacking] and [Planetary Stacking] on this page. Let’s talk about the DSO Stacking first. This feature is different from the live stack that we used to know. Live stack is for you to stack the DSO data while capturing, while the DSO Stacking here is for you to stack and simply process the data after you complete the data acquisition.

Choose the files you’re going to stack. The stacking process will be automatically done once you click [Done].

You will see how many frames were stacked successfully and how many are failed from the pop-up window.

The stacked fits files can be viewed, shared as a JPG to the ASIAIR community, and also edited if you want to further improve the image quality.

The adjustable options include histogram, brightness, contrast, saturation and Bin mode.
You can also crop the image or mirror, rotate it as you wish.

The whole stacking and processing progress is very quick and easy. Of course, if you want to do some more advanced post-processing work for your image, you may still choose Photoshop or PixInsight, but ASIAIR offers a much easier choice for all astronomy amateurs, especially the new beginners. You can produce a good enough astrophoto in minutes, instead of sitting before the computer for hours with a deep frown on your face.
Below is the NGC6992 before and after stack.

Apart from DSO stacking, ASIAIR can also do planetary stacking. You can stack and sharpen the Sun, our Moon and the planets in the solar system. To help you get a better solar or lunar image with clear details, ASIAIR allows you to choose the alignment point before stack. And for solar stacking, ASIAIR also supports colorization for mono image and color invert.
Basically, the stacking process for planetary videos is similar to DSO stacking. One of the few differences is that the histogram can only be viewed but not stretched in edit.
Choose the video you’re going to stack.

Stacking.

Sharpen the image or do other image adjustments.

Share it to the community or save the image.

Really simple, right? With the new 2.0 version of ASIAIR, you now can complete the whole capture and process workflow on your phone. Astrophotography can be fun for every amateur, no matter you are a master or just a newbie.
Recently, a major discovery by an international team of amateur astronomers and scientists has become a huge online hit, and this new discovery is just located in one of the
From Seestar to Pro: Dominik Popławski’s Journey into Deep-Sky Imagin Hello. My name is Dominik Popławski. I live in Poland. I’m a painter and computer graphic designer. Astronomy has been
My name is Eric Wright and I’m a 39 year old Astro photographer and cybersecurity technician in the Cleveland, Ohio area (United States). I am the current Secretary for the
Some astrophotographers spend years searching for the perfect image. For Deqian Li, the journey began only in 2024—yet within a remarkably short time, several of his images have already been
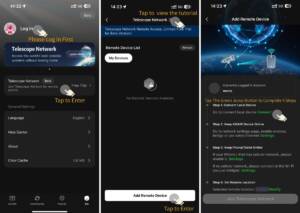
Part 1: What’s New in ASIAIR V3.0 New Features Optimized & Fixed Telescope Network is now live No matter where you are, as long as your device is online, you
How It All Began Meet Benoit De Mulder(@ bigbenuniverse) , 52, and started visual astronomy at the age of 8. “For as long as I can remember, I’ve been fascinated