

Discovery of the M31 [OIII] emission arc
Recently, a major discovery by an international team of amateur astronomers and scientists has become a huge online hit, and this new discovery is just located in one of the
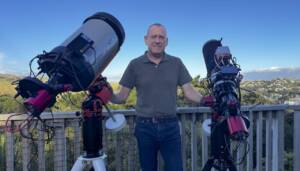
bbrown_admin, October 30, 2025
The ZWO ASI585MC Air came well packaged from the manufacturer. The box is improved and has an impressive feel with a magnetic closure on the wrap-around box. This configuration will make it more durable and useful for storage and travel.
Inside of the box you will find a contents card with visuals of each item and quantity to include part numbers for future use in case you need to reorder. On the reverse are QR codes for ZWO and WeChat, along with social media links for ZWO.
Below that is the Quick Guide for the ZWO Wireless Smart Camera
Securely and Neatly packaged in its zippered Black padded case you will find the ASI585MCAir.
Besides the camera is the accessory box which contains:
(1) DC 1.5m Male to Female extension cable
(1) DC 1.5m Male to 1.5m Male cable (to provide power input)
(2) USB 2.0 A to B .5m cables
(1) 1m velcro strap for cable management
(1) Antenna for the Camera/Air
(1) M42M-M48F 16.5mm extension
(1) M42M-M42F 21mm extension
(1) M42-M48 Tilt adapter ring
(1) M2.5mm hex wrench key
The power can be supplied by any of the connections on the camera, according to the quick guide. I am powering on using the 1.5 DC connection labeled input. I was greeted with a voice prompt waiting for a connection.
I connected to the Asiair wifi (sticker with name on bottom of camera) with the default password 12345678
On launching the Asiair app I was prompted with Update Firmware. The Factory installed firmware was 41.63 and the latest was 41.89. By clicking Update Now, the process took almost no time to download and the install process was very quick and was under a minute to update.
On rebooting, I was greeted with a welcome screen and prompted to active the air online. By clicking activate the screen refreshed to show it was activated and waited on me to hit confirm.I was then taken to the normal screen of all components it was connected to. The Main camera was populated as ZWO ASI585MC Air and the Guide Camera was populated with ZWO ASI220MM Air and you are prompted to enter information into the Focal Length for the guide scope (Same as your Main Scope) a value of 0 will bounce you back until you enter a value.The next screen is the customary main interface screen in ASIAIR I next clicked on the WiFi icon on the top ribbon bar and then scrolled and clicked Personalization to change the volume to loud. You can also change the temp readout from C to F here.
To customize the WiFi name and password you need to click under the WiFi Name in the interface and then click edit. From that point you click in the WiFi Name box and password respectively and type in your desired name and password. When you exit back to the main interface, the Air will disconnect and you will need to join the new WiFi name and enter your password then go back to the ASIAIR application.
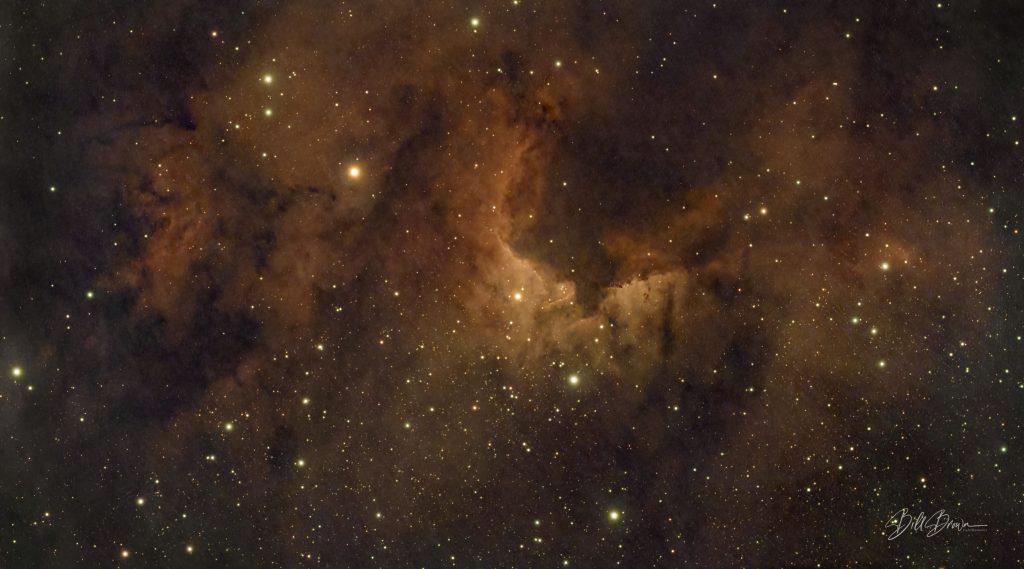
For the initial single-night test target I chose Caldwell 9. SH2-155, commonly known as Cave Nebula C-9 is a diffused emission nebula in Cepheus, and SH2-155 is an ionized Ha region. Seeing that I was evaluating from a dark sky area and that there is ample dark nebulosity to evaluate noise and well depth with the time I had allowed before moon rise. I also wanted to minimize moon wash, I chose a single dual-band filter, Opting L eXtreme.
I planned to get my calibration frames during civil twilight and start shooting as soon as it was astronomical twilight. Polar Alignment was early and quite easy to accomplish before being able to see any stars with the naked eye. I set my normal temperature at 0C.
For calibration frames, I shot Darks for guiding sensor correction, Bias frames for the 585, and Flats for the 585. Darks are not required as there is virtually no thermal noise and zero amp glow.
For the light Frames, I chose 5min exposures at unity gain (252) and for the number of exposures, I set 75. On execution of the plan, there were no issues in the air settling in on target on its first attempt. Guiding was extremely impressive at .25” and at times just a little higher but always below .5”.
I had to leave a bit earlier than planned but was able to capture 63 light frames.
The data looked good with nice round stars on the entire frame. The expected results from Weighted Batch Preprocessing were observed.
I ran through my normal OSC workflow in PixInsight and the outcome did not disappoint.
The camera does extremely well on the AskarV, It pairs well and the lack of cables makes the configuration extremely easy and care free due to the lack of cables that can snag or hang as the target progresses through the sky relative to your position.
There is ample storage on the device (256G) for several targets per night and several nights for a longer trip without the need to transfer them or carry external storage.
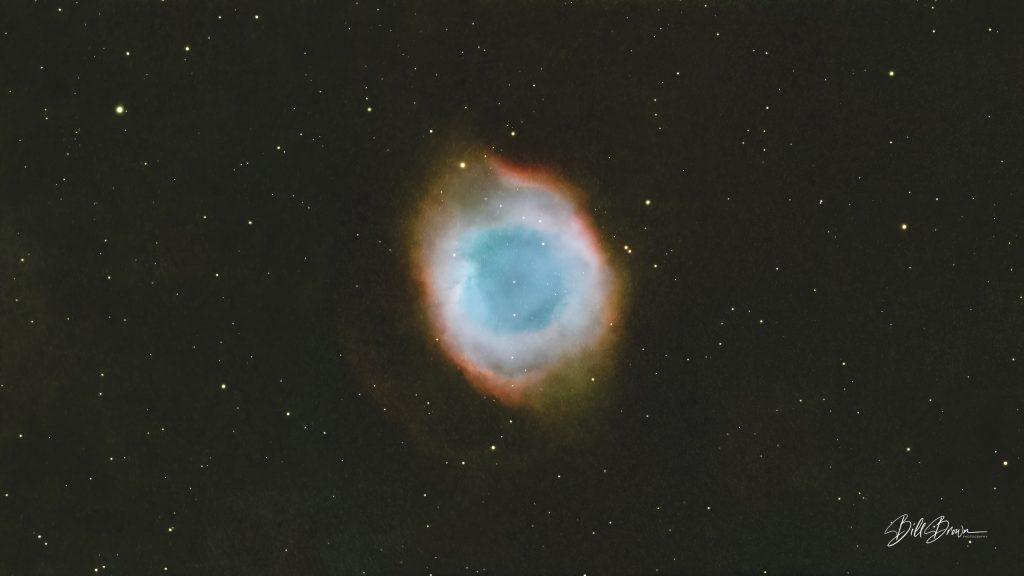
For the second session, again I chose a target low in the south with a light dome from the nearest major city. The Helix Nebula. I chose to capture it again @600mm with the Askar V utilizing Askar’s Color Magic C Filter set. (Ha and OIII for C1 and OIII and SII for C2) I had one night to gather the data. The familiar interface of the integrated Asiair was straightforward to configure for the session. The EAF Pro connected via Bluetooth without incident and the Mount (AM5) connected to the Asiair via Wifi.
One thing I noted was after polar alignment and new flat calibration frames. (New firmware with default gain of 200 to provide more dynamic range), was that when executing the plan, the air vocalized finding the object but the mount did not move immediately. Instead, it took what seemed like a minute before the mount started moving. I have emailed support (*NOTE support was very quick to respond and identified that my mount had the original firmware and required updating. Once updated the issue was resolved)
The results again were as expected and the framing provided in the atlas matched the subframes quite accurately.
My final image was processed with my normal OSC PixInsight workflow and came out very well with a lot of detail with the limited integration time acquired. More time would bring out some of the fainter details.
With the results and seamless integration for an all-in-one solution for a complete system, this would serve extremely well as a no-fuss setup as a great venture into a dedicated solution as well as for a no-hassle travel setup for star-parties, trips, and vacations, etc.
I had up until tonight been experiencing a sluggish response with the all-in-one unit. Although I could use everything wirelessly, I had noted a definite slow response between when I would execute a plan and the air would announce finding the target. There was an extended pause and the mount would then actually slew to the targeted when acquiring the target and checking for center alignment which would cause several attempts to center. The main concern was that the delay in acquiring would cause star trails after a meridian flip. My immediate workaround was to add a delay to start imaging after the flip. Tonight I chose to hardwire the mount to the AsiAir.
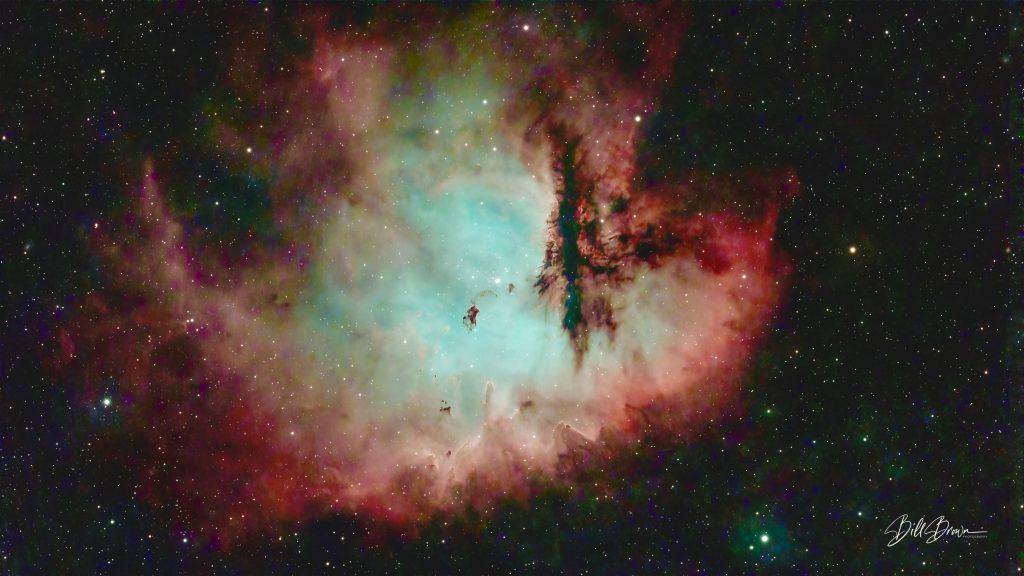
For tonight’s test, I chose NGC281 PacMan Nebula again with the Askar C series Color Magic filter set to provide the SHO pallet data. The firmware update to my mount resulted in the snappy normal response to commands.
Update on the EAF Pro, I am finding myself getting accustomed to the On/Off power button for the EAF Pro. I had missed turning it off on the first image night or two. If you are upgrading from the older EAF you need to add the verification of power switch position to your routine to circumvent arriving for an evening shoot and having a dead battery on your focuser. If that should occur to you, you can power the EAF Pro via a USB cable to your power bank or to one of the open ports on the ASI585MC Air.
I recommend that you validate your firmware versioning for your mount and ensure it is up to date. The method is via the SkyAtlas app. It is straightforward and only takes a minute to complete. I started a 4-panel mosaic in the SHO pallet, so 8 different frames total. I had normal process speeds in every aspect during the capture of data. I was able to capture solid data every night, all night long without incident. The all-in-one solution worked flawlessly and without cables!
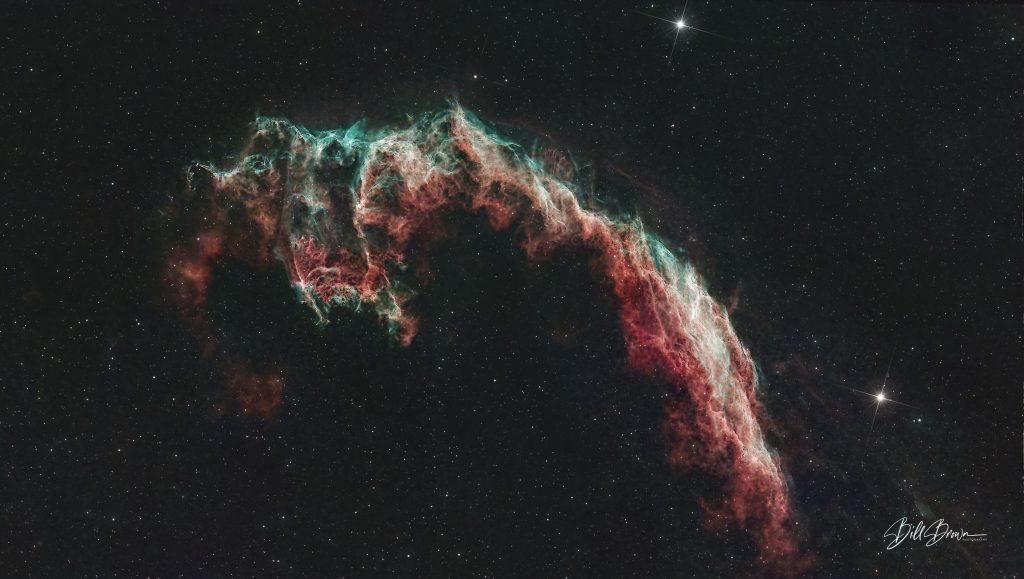
I chose NGC6992 (Eastern Veil) and to fit the image in at 600mm I set up a plan in the air for a 4-panel mosaic which I ran twice (Once per filter in my Askar Color Magic Kit) I simply changed the name of the target to reflect the filter.
The time on each frame per filter was 2hours. I am very pleased with the results.
With this final validation, I am wrapping up my review of the ASI585MC Air.
The ASI585MC Air is the perfect camera for a travel kit for everyone, from beginner to advanced astrophotographer. You will need to pair it with an appropriate focal length scope to frame your intended target and this fits perfectly with my travel range of 277-600mm.
The all-in-one innovation allows for less potential issues caused by multiple, separate devices as well as any potential cable issues, which can either be forgotten at home or they may fail or even worse, come unplugged or hung during the mount movement throughout the night.
This is also the ideal first dive into a dedicated cooled Astrocam-driven kit for someone looking to take the step towards a dedicated astrophotography kit. I highly recommend this for either option. It is a solid competitor with astounding performance and great support.
I would also pair this with the ASI EAFPro reviewed at the same time for an equal experience for both travel or a permanent home station and eliminate another cable. During my review of both, I have become quite fond of the solid performance and lack of need for wired connections. The added convenience of a USB-C chargeable EAF negates another cable from either your camera or asiair to power your auto focuser. This will undoubtedly be the norm going forward as equipment evolves.
If you would have any questions, please reach out to me through the West Virginia Astrophotography Association. We are here to help you with your journey.
Join, Learn, Pass it on!
Bill Brown, President,
West Virginia Astrophotography Association.
Recently, a major discovery by an international team of amateur astronomers and scientists has become a huge online hit, and this new discovery is just located in one of the
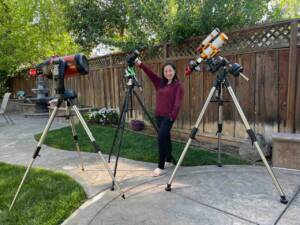
Tracy Cao is a 45-year-old stay-at-home mom based in Pleasanton, California, who discovered her passion for astrophotography in the summer of 2021. Although she is relatively new to the industry,
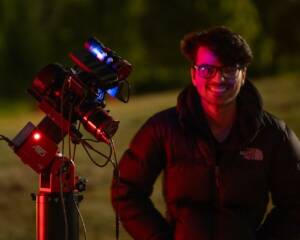
“My Name is Willie Stickley (@WillieHustles) and I am a 26 year old photographer and videographer from Cleveland, Ohio (United States) and I am the current Vice President of the
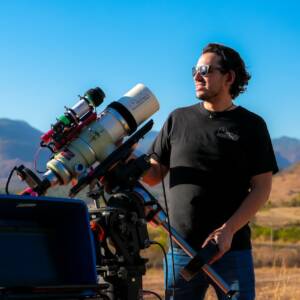
Guillermo Cervantes Mosqueda is an astrophotographer lives in Poncitlán, Jalisco, Mexico, whose fascination with the night sky began with astronomy books in his childhood. His journey officially took flight in
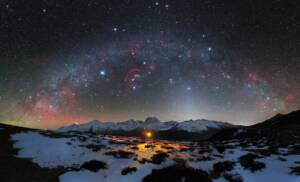
Being an astrophotographer is the most romantic job in the world. But behind that romance lies a canvas of isolation and peril.From standing helpless and alone at the Baima Snow
Peter Ambrose lives in Porirua, Wellington, New Zealand, after moving there from his hometown of Christchurch in 1991. Now retired from corporate life for over 13 years, he has been