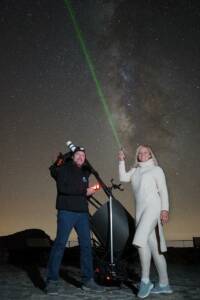
Every astrophotographer knows the feeling. The equipment is ready, the forecast looks good, and the clouds arrive with impeccable timing. This is the story of how two backyard imagers finally accepted that the problem was not their processing and built a remote imaging system that now operates under the dark, predictable skies of southern Spain.
What followed was a series of small, logical decisions that, when viewed together, probably required adult supervision.
We first crossed paths on Instagram, brought together by a shared realisation that astrophotography is not really about telescopes at all, it is about people. People scattered across the world, standing under different skies, all trying to tell their own version of the same story. As it turned out, one of those people lived only a few miles down the road.
What began as casual conversation about images, settings, and the usual “how did you process that?”, questions slowly turned into something more practical. When Jamie headed off on a two-month work trip, Phil offered to keep Jamie’s telescope running from his own backyard. It seemed simple enough at the time. Keep it powered, keep it dry, press go when the sky allowed.
That small favour became Jamie’s first real taste of remote imaging. Logging in from miles away, checking the weather obsessively, watching data appear while being nowhere near the hardware. It was equal parts exciting and mildly terrifying.
From that moment on, the idea stopped feeling abstract. Remote imaging was no longer something other people did somewhere else with budgets we did not have. It was already happening, right there, between two friends. Everything that followed grew naturally from that point.
A Little Bit About Us
Jamie’s (#BackyardSpaceDude) journey into astrophotography did not begin with forums, books, or carefully researched purchases. It began with a single image shared on social media by a friend’s dad, Roger. That image stopped him completely. The reaction was immediate and unfiltered.
What is that?
Roger’s response was everything that makes this hobby what it is. Patient, open, genuinely enthusiastic. He explained what Jamie was looking at and how it was made. That was all it took, the hook was set.
What followed was a journey spanning more than a decade. Early DSLR images taken through entry-level telescopes, plenty of trial and error, experiments with subscription data when the weather refused to cooperate. Slowly building confidence, skill, and ambition. Each step pushed the horizon a little further away until the backyard began to feel less like a launchpad and more like a constraint.
Phil’s (#AstroPhilth) route into astrophotography could not have been more different.
Freshly married, a honeymoon cut short by the first COVID lockdown, and suddenly plunged into isolation, there was time to fill and energy to focus. Something technical, something creative, something that would completely consume attention.
That something turned out to be astrophotography.
Armed with a William Optics 103ED and a Sony A7R II, Phil set his sights on Andromeda. The first image was thrilling for about five minutes. Then came the realisation that it could be sharper, cleaner, better. That feeling never really went away.
What followed was a cycle many astrophotographers know well. Changing mounts, refining setups, upgrading optics. Fixing one problem only to discover three more. Never quite satisfied, always pushing forward. Eventually, both paths arrived at the same conclusion. The next step was not another upgrade in the garden, it was something bigger.
Decision Time
Once that idea took hold, things escalated quickly.
What followed felt like a deep dive down a rabbit hole that had no obvious bottom. Weeks were spent researching, debating, and questioning every possible option. Shipping equipment to the United States versus staying within mainland Europe. Costs, logistics, support, travel, time zones, insurance, customs. Every detail mattered, because every mistake would be very expensive and very far away.
At first, established observatories in the United States seemed like the obvious choice. Proven, professional, trusted. But the more we talked, the clearer it became that something was missing. We did not just want to rent a pier and plug in a finished system. We wanted to be involved in the entire journey, from bare ground to first light.
So we doubled down. Emails went out, calls followed. We spoke to observatories across Spain and Portugal. Then, almost by chance, a reply landed from David at Pixel Skies.
“You’re in luck. We’ve just broken ground on the next four observatories.”
Within days, we were on a video call, looking at fresh concrete, open land, and a sky that seemed to go on forever. We chose our pier there and then, but then came the final, unexpected bonus. The observatory would not be ready for six months.
At first, that sounded like a delay but it turned out to be exactly what we needed.
Six months gave us time. Time to design properly. Time to build carefully. Time to run everything in the garden, break it, fix it, and learn its quirks before packing it all down. The plan was set. Build at home, drive across Europe, install under truly dark skies.
Remote imaging no longer felt ambitious. It felt inevitable.
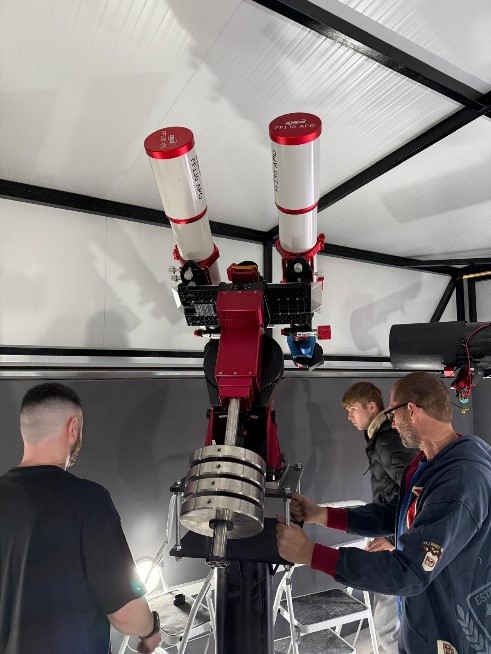
The Mount
This was one of the biggest decisions we made, and we knew it.
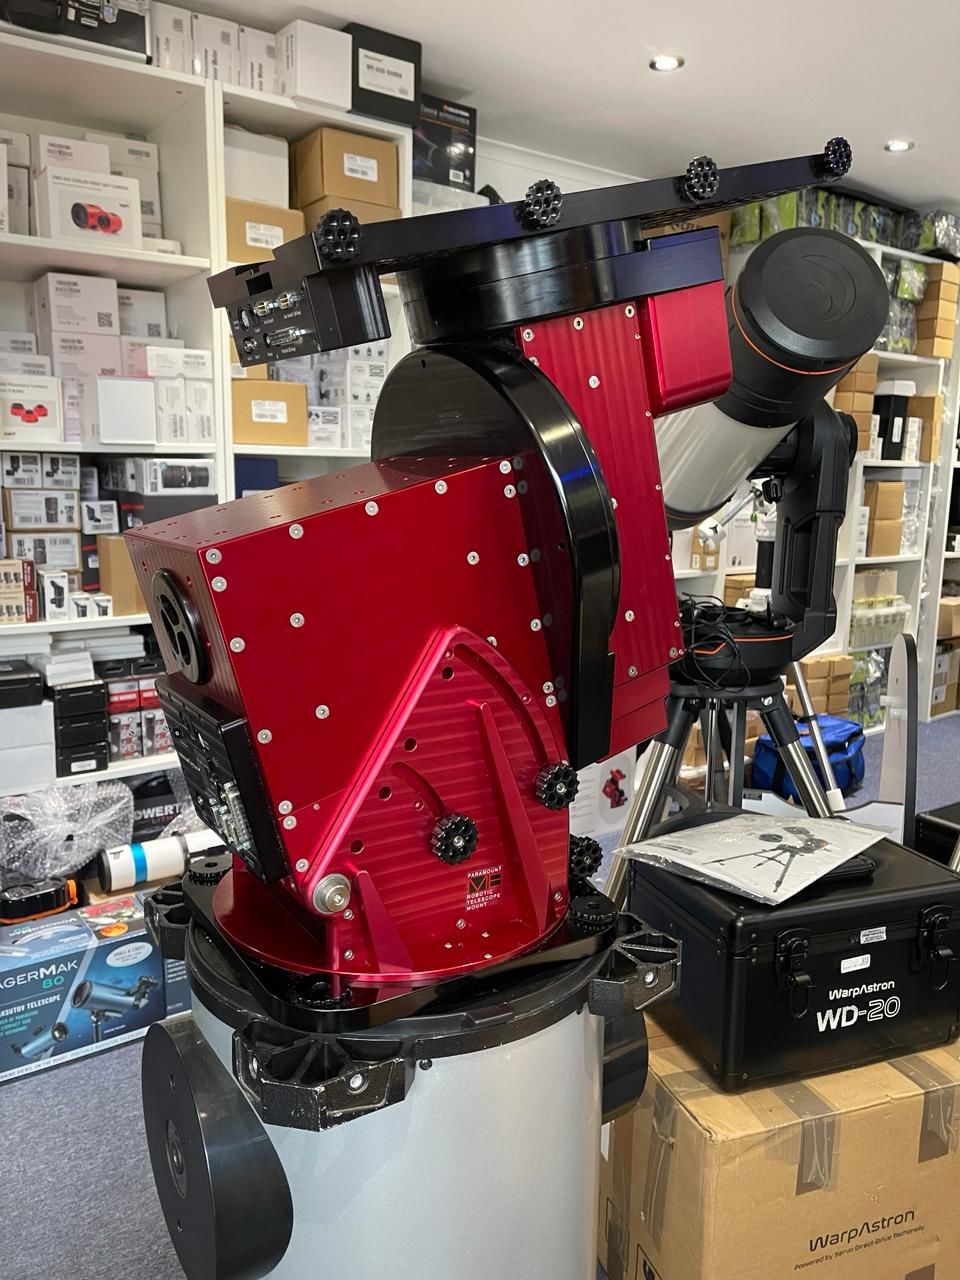
Whatever went to Spain could not just be “good enough”. It needed to be bold. It needed to define the system. At that stage, we did not yet know exactly what the optics would be, but we knew one thing for certain. Whatever we built had to sit on something strong, robust, and proven in observatory environments.
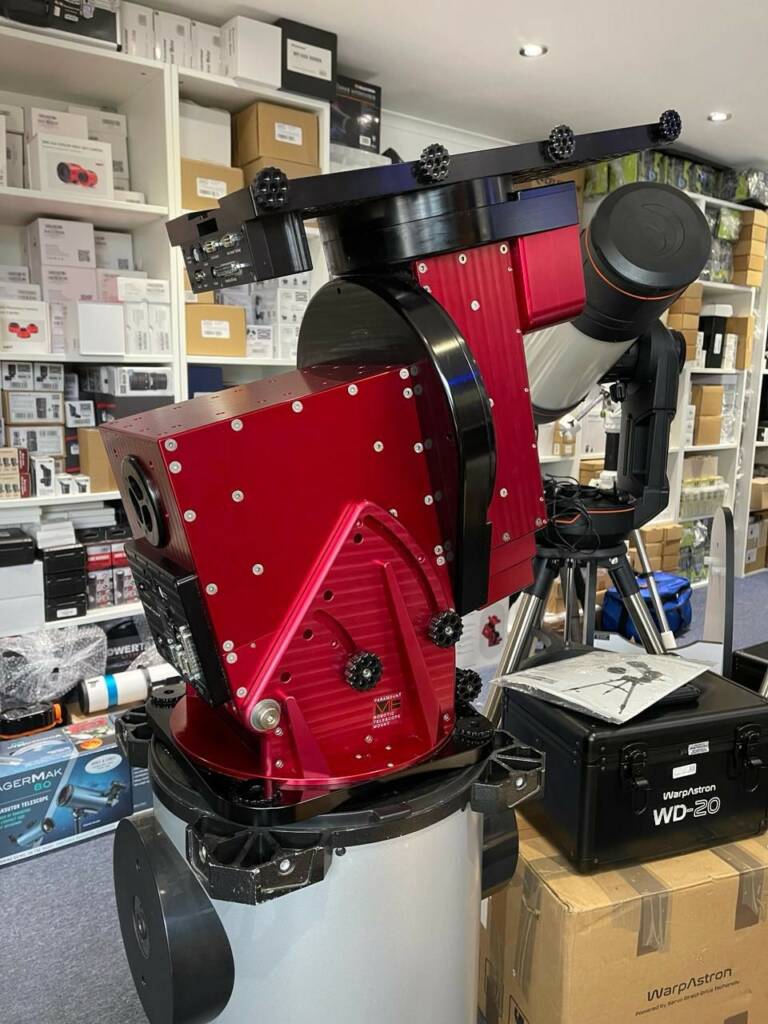
We spoke to our friends at the The Widescreen Centre. After a lot of discussion, Simon came back with a suggestion that stopped us mid-conversation, a Paramount ME. Originally intended for their own observatory, now unexpectedly available.
This was not a casual upgrade. This was the sort of decision that makes you sit quietly for a moment. exciting and intimidating in equal measure. A mount we had only ever seen used by professional observatories and the people we watched online. The kind of kit you admire from a distance and never seriously expect to own.
But the more we talked it through, the more it made sense. If we were committing to a remote observatory, this was the foundation it deserved.
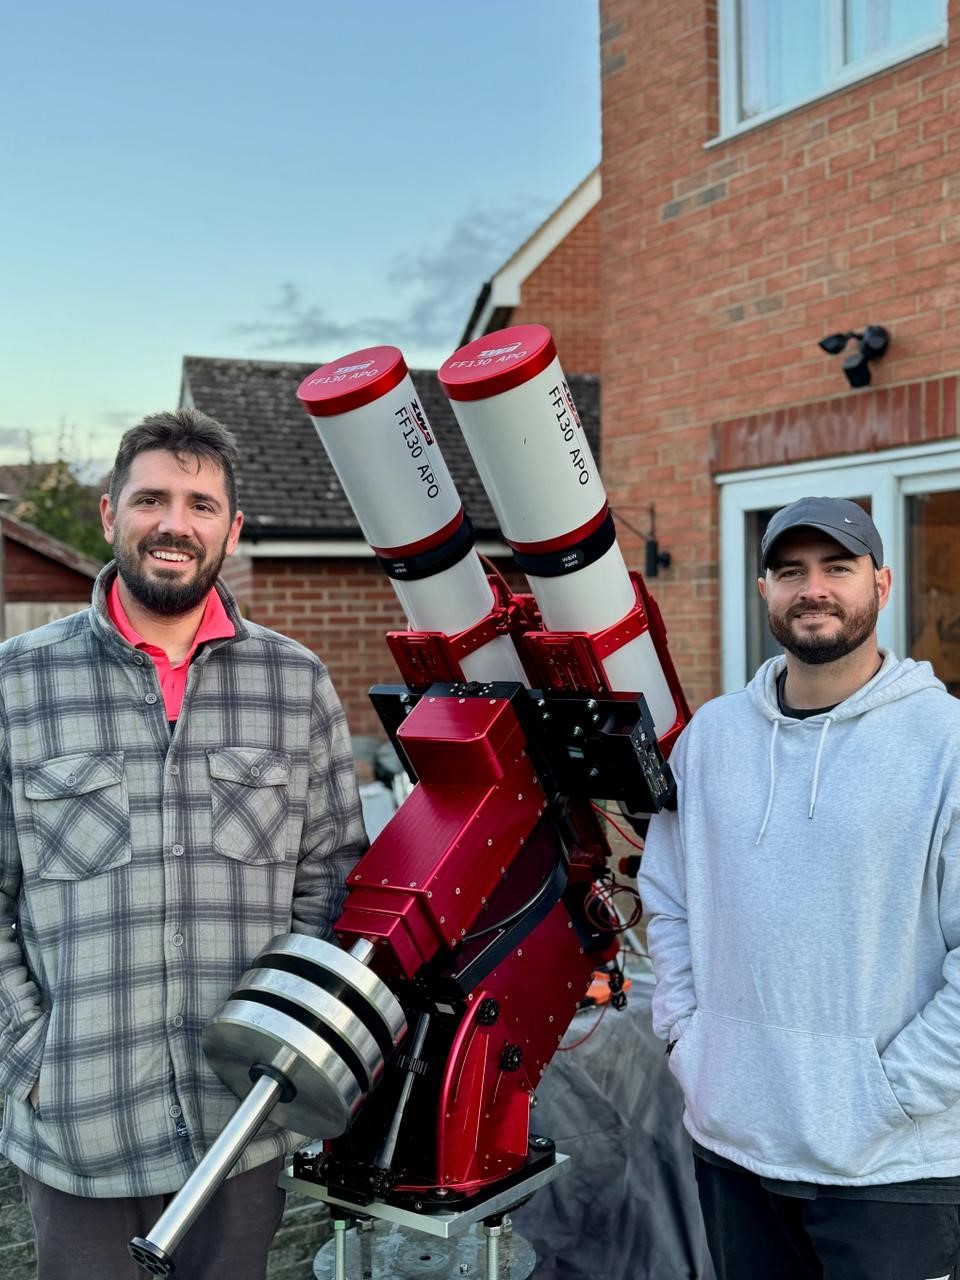
Phil’s birthday was approaching. Somewhere between careful reasoning and reckless enthusiasm, the decision was made. The money was sent and a pickup truck loaded. The project officially crossed the point of no return.
The Scopes
If the mount decision sent us down a rabbit
hole, choosing the optics took us even deeper.
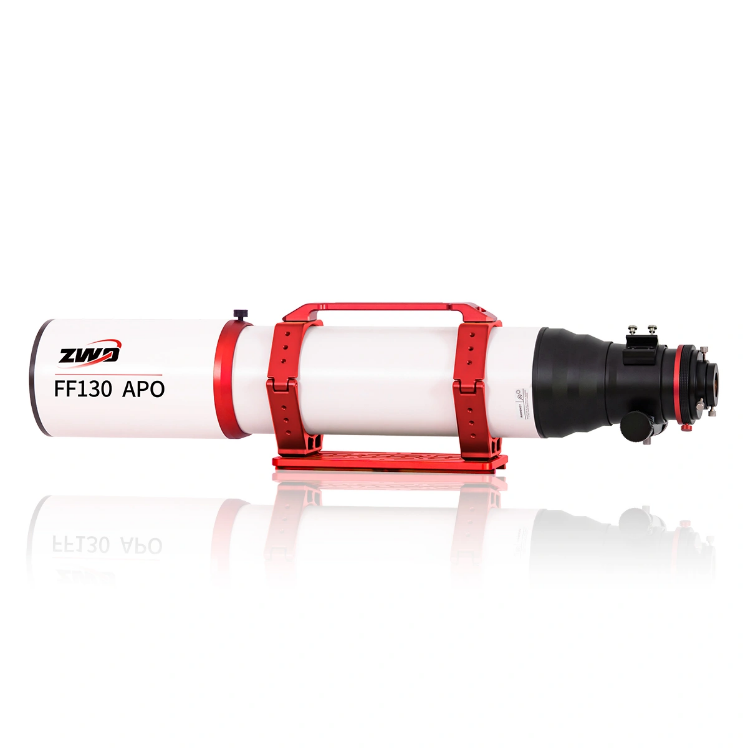
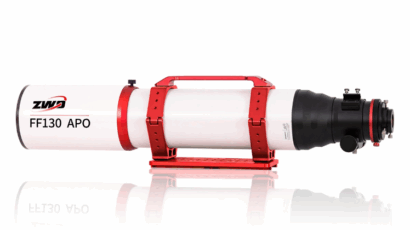
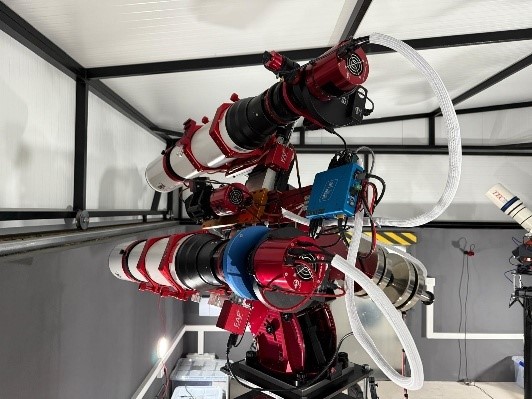
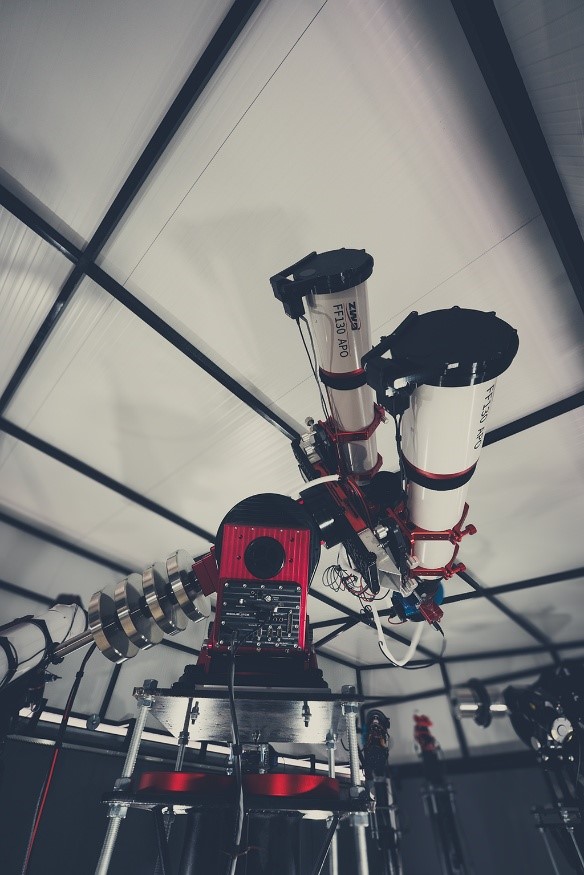
Between us, we already owned a lot of telescopes. Jamie had an Esprit 100ED and a 200P-DS Newtonian. Phil had a ZWO FF130 and a Quattro 12. On paper, some of it lined up reasonably well. In practice, it did not. Different weights, different mechanical behaviour, different compromises.
And while the mount was more than capable of lifting serious payloads, we were careful not to confuse capability with good practice. Just because it can lift something does not mean it should. Balance, repeatability, and long-term reliability mattered far more than chasing maximum capacity.
What became clear was that we did not want to force compatibility. We wanted twins. Identical instruments, identical behaviour. One system, one response.
The solution had been sitting in front of us the entire time.
The FF130 was still relatively new when we started planning. Optically excellent and technically solid. No collimation rituals, no backfocus puzzles, just a clean, modern imaging scope that did exactly what it said it would.
And then there was the colour.
Make no mistake, the ZWO red was not an afterthought. It was bold, confident, and unapologetic. This system was not meant to blend into the background. It was meant to stand out.
We sold what no longer fit the plan and ordered a second FF130. Finally, true twins. For the first time, the system felt intentional rather than assembled.
The Cameras
Compared to everything that came before, choosing the cameras was refreshingly straightforward.
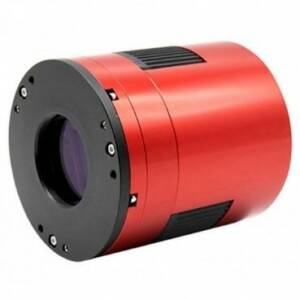
We both had extensive experience with the ZWO 1600MM Pro and still owned one each. It had served us well, but Micro Four Thirds was starting to feel like a limitation. Ideally, we wanted full frame, but the reality of filter costs and system complexity brought us back to earth very quickly.
The 2600MM Pro landed perfectly in the middle. APS-C. A meaningful jump in field of view and, crucially, compatible with the 36 mm filters we already owned. That single detail saved the project from spiralling out of control.
One of the 1600MM cameras found a new life on a Samyang 135 mm, becoming our widefield system, rather than being retired.
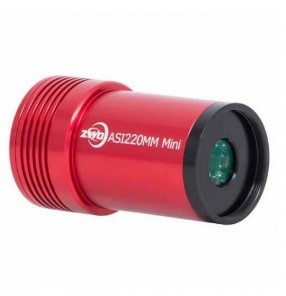
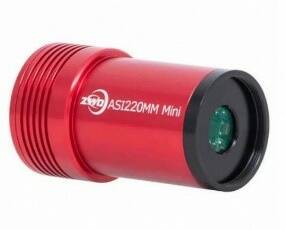
For guiding, redundancy mattered. Even with a mount of this calibre, we wanted a safety net. The ZWO 220MM Mini paired with an OAG-L became a core part of the system, especially later when we chased more subtle guiding issues.
And quietly, without ever formally deciding it, everything ended up red.
The Accessories
If choosing the mount and scopes felt like big decisions, accessories were where the build tried to overwhelm us through sheer volume.
This is the stage where the project stops being “a telescope setup” and becomes a system. A system has opinions, a system has dependencies, a system has that one cable you swear you tightened, but somehow it still comes loose at the exact moment you are 1,600 miles away.
Suddenly we were talking about filter wheels, off-axis guiders, power distribution, USB hubs, rotators, flip-flat light covers, focusers, dew control, strain relief, cable routing, and a bunch of small parts that somehow cost the same as a nice holiday. Every choice affected three others, and every forum thread came with a confident stranger insisting the opposite of what the previous confident stranger said.
By this point we were very aware we had started moving into the ZWO ecosystem, and that was intentional. We wanted consistency, clean integration, and fewer “it might work if you reboot it” moments. But we also had to be realistic about timing. Some things we wanted simply were not available yet, and the project had a deadline. Spain was booked, the observatory slot was real, the sky was not going to wait for product release cycles.
Rotators were the big one.
ZWO rotators were being talked about heavily, but they were not in our hands when we needed to build. We did not want to postpone the whole trip, and we definitely did not want to arrive in Spain and realise we could not frame targets properly. So we made a pragmatic call. We went with the Pegasus Astro Falcon and Wanderer Astro rotators, because they were available immediately and let us get the system operational.
That decision was never a rejection of ZWO. It was simply us choosing momentum over waiting. And yes, we fully intend to move to ZWO rotators later. The red is still calling, and we are not pretending it’s not.
Focusing was the opposite experience. We did not debate it for long because the answer was obvious. The ZWO EAF made sense, integrated cleanly, and behaved like it belonged in a system that had to work remotely. It was one of those rare decisions where we did not need a spreadsheet, a whiteboard, or a group therapy session.
Filter wheels followed the same logic. Straightforward installation and clean integration meant we were not introducing unnecessary complexity into a system that already had plenty of moving parts. The more we built, the more we appreciated anything that bolted on neatly and just worked.
For calibration and dust protection, we went with Deep Sky Dad flip-flats. They offered a sensible interface and worked directly with N.I.N.A for automation, which mattered a lot for remote work. Taking flats is not glamorous, but neither is fixing gradients for the rest of your natural life, so we treated that part seriously.
Then came power and USB. This is the part that nobody brags about, but it’s the part that decides whether your remote setup is a joy or a nightmare. With two main imaging scopes and a widefield system sharing a mount, cable management stopped being a preference and became a requirement. We opted for the Pegasus Astro Ultimate Powerbox V3 because it gave us a tidy, central way to manage power distribution and USB connections, and it helped us route cabling logically across the rig.
And that is the real story of accessories. Not the brand names, not the spec sheets, not the debates. It’s the quiet obsession with reliability
By the time we finished this stage, the build stopped feeling like a pile of parts. It started to feel like a cohesive system. And yes, a growing amount of it was ZWO red, which did not hurt. Red looks good in the daylight. Even better under Spanish skies.
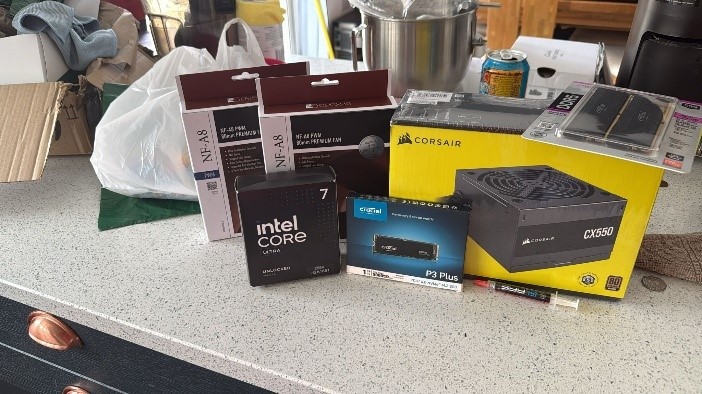
The PC
If the mount was the backbone and the scopes were the personality, the PC was the brain. And we learned very quickly that a remote system of this scale does not forgive a weak brain.
In the backyard, you can get away with a lot. If something crashes, you walk outside, sigh at the sky, reboot the laptop and pretend it never happened. In Spain, you do not get that luxury. If the system hiccups at 2 a.m., it needs to recover properly, explain itself, and carry on without drama. Preferably without us doing the long distance version of turning it off and on again.
We were not building a simple capture machine. We needed this PC to run three independent imaging trains at the same time, plus a constant stream from the off-axis guider. It had to run three instances of N.I.N.A, TheSkyX for mount control and modelling, and PHD2 for guiding. On top of that, we wanted a layer of our own software to manage startup routines, monitor what mattered, and tell us when something was going wrong before it turned into a ruined night.
Storage was another big piece of the puzzle. Three scopes imaging at once means three times the data, three times the chances of something filling up at the worst moment, and three times the pain if something corrupts. We needed fast storage, sensible separation between the operating system and data drives, and enough headroom that we were not constantly juggling disk space like it was part of the hobby.
So we built a rack mounted imaging server. Practical, tidy, and far easier to treat like observatory infrastructure rather than “a PC we left out there”.
The core spec looked like this:
• Windows 11
• 1 x 1TB NVMe for the OS
• 2 x 1TB NVMe drives for data storage
• 32GB DDR5 6000MHz RAM
• Intel Ultra 7 265K 20 core processor
The important part was not the numbers; it was the intent. We wanted consistency under load. Once imaging starts, the PC does not get to rest. It’s juggling downloads, writes, plate solving, guiding, sequencing, and all the usual background tasks that love to appear the moment you need everything to behave.
For moving the data safely, we use Syncthing to transfer everything from the observatory back to a backup server in the UK. That server writes to a 50TB RAID, which gives us redundancy and a single place where we can both pull the data down and work on it without playing file ping pong.
Then came the part we did not realise would become such a big deal at the start: our own software layer.
We built a bespoke system that watches the observatory like a nervous parent. It monitors and categorises the weather provided by the observatory both live and historically, which sounds obsessive until the first time you are trying to understand why guiding suddenly went strange at 3 a.m. and you realise the wind picked up ten minutes earlier.
It also turns every FITS file into a compressed, stretched JPEG and sends it to Discord so we can visually track the data as it comes in. That single feature has saved nights. It’s hard to overstate how useful it is to spot a problem early, rather than discovering it the next day when you have politely collected eight hours of out of focus nothing.
On top of that, it keeps us informed. We get notifications when the system boots, when imaging starts, and when it ends. We get alerts if the roof closes, if the wind climbs above our comfort level, or if N.I.N.A throws an error that needs attention. We can also track projects and know when a dataset is complete without manually counting frames like we are doing accounts.
This is the part that really takes the edge off remote imaging. It turns a distant system into something we can understand at a glance. Instead of guessing what is happening hundreds of miles away, we have visibility, context, and confidence.
We could genuinely write an entire article on the PC alone, but the short version is this. The hardware keeps the system running, but the software keeps it sane.
The Journey South
Eventually, planning turns into packing.
Sixteen hundred miles. A train that goes under the sea. A pickup truck filled to the roof with astronomy equipment that most sane people would not trust on a trip to the local shop, let alone another country. Two astronomers, a carefully curated playlist, and the growing realisation that we were very committed to this idea now.
We set off knowing the drive itself would be largely uneventful, but every mile felt like a countdown. There is something about transporting your entire rig in one vehicle that sharpens your awareness of every bump in the road.
We drove through the night. Hour after hour passed in a blur of motorway lights, service stations, and conversations that bounced between excitement, logistics, and the occasional moment of silence where both of us were quietly thinking the same thing: please let everything arrive in one piece.
Sleep was optional. Adrenaline was not.
As the sun came up, the landscape began to change. The land grew barer, wider, quieter; towns became sparse; the sky felt bigger. Somewhere in that gradual shift, it finally landed. We were in Spain. Not just Spain, but somewhere genuinely remote. Somewhere where darkness was not a marketing phrase, but a natural state.
That final hour felt endless.
When we arrived, David and his family were there waiting for us. Immediately, any lingering nerves disappeared. We felt welcome, supported, and very aware that we had a long afternoon ahead of us. It was around three o’clock. We had been driving for almost twenty four hours. Naturally, we decided we wanted to image that night.
Everyone moved instinctively. The pier was drilled and fixed, the mount went on, the rig began to take shape piece by piece. Cables were run, connections checked. power applied. Fatigue faded into the background as focus took over.
There is a particular kind of calm that comes from doing exactly what you have planned to do for months, but in a completely new place.
And then it happened.
The system came to life.
Not long after, the first subframes arrived. Clean, real, Spanish skies. Data flowing from a system we had designed, built, tested, packed, driven across Europe, and reassembled.
That moment alone made every mile worth it.
It was time for bed.
The following days were spent doing the unglamorous but essential work. Tidying cables. Refining layouts. Making sure everything was set not just for first light, but for long term reliability. We wanted to leave knowing the system could look after itself when we were gone.
Eventually, it was time to head home.
We left tired, dusty, and quietly proud. The system was live. The remote rig was real. And the journey from backyard imaging to remote skies was no longer an idea we talked about. It was something we had done.
A Year Later
A year on, the question everyone asks is simple.
Was it worth it?
Absolutely.
Has it been perfect? No. And it should not be portrayed as such.
We had guiding issues early on. Jamie balances telescopes with a level of precision that suggests a former life in wizardry, so we knew balance was not the problem. After weeks of failed models and growing frustration, we were introduced to Peter Shah. Within minutes, he spotted the issue. The mount and the software disagreed on where they were pointing. One parameter change fixed it.
That moment alone justified every conversation that came before it.
We had a PC failure during an extreme Spanish summer. Phil drove back out to Spain, rebuilt it on site, and we moved on.
Beyond that, the system has been remarkably stable.
In one year, we have captured well over a thousand hours of data. More importantly, we have found genuine enjoyment in operating a system hundreds of miles away, knowing it will do exactly what it’s supposed to do.
Would we do it again?
Yes, without hesitation. In fact, we’re already discussing it.
If there is one thing we hope this story shows, it’s that remote imaging is not reserved for institutions or unlimited budgets. With planning, the right people, and a willingness to learn, it’s achievable.
And it helps when almost everything comes in red.
A sincere thank you to ZWO for producing the products that made this journey possible.
Images:
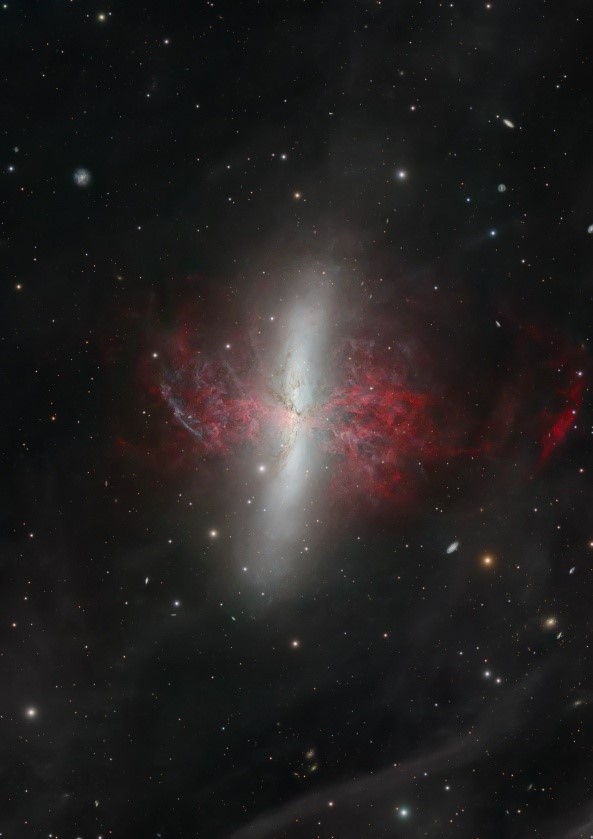
M81 & M82 – Bode’s Galaxy and the Cigar Galaxy
This paired view of Bode’s Galaxy and the Cigar Galaxy represent one of the most ambitious projects undertaken with our remote system to date. With a total integration time of 420 hours, it remains one of the longest datasets we have completed since the system went live.
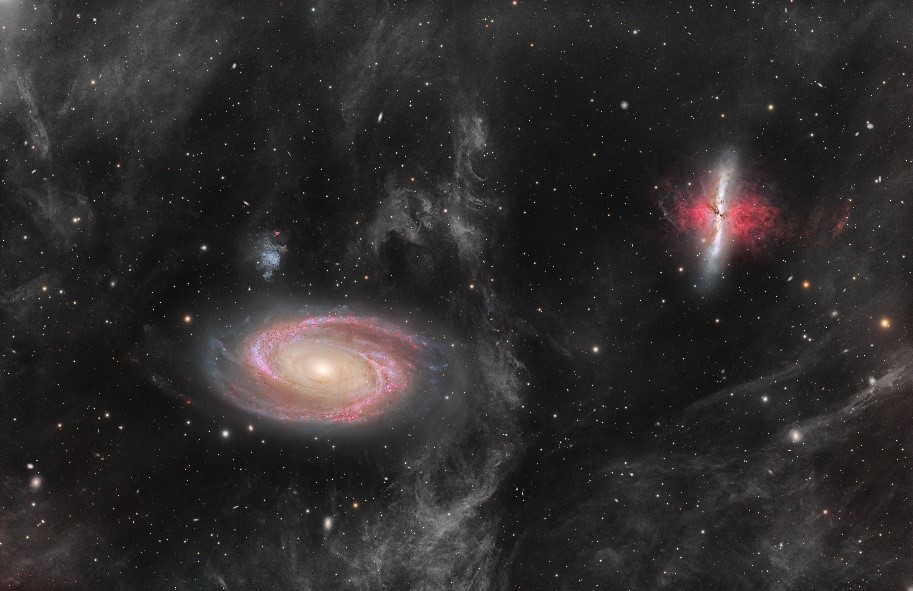
The image was published in Astronomy Now and received a Top Pick award on AstroBin. Jamie’s cropped and reprocessed rendition of the Cigar Galaxy was also recognised as Image of the Day on AstroBin, highlighting the depth and structural detail made possible through extended integration under dark skies.
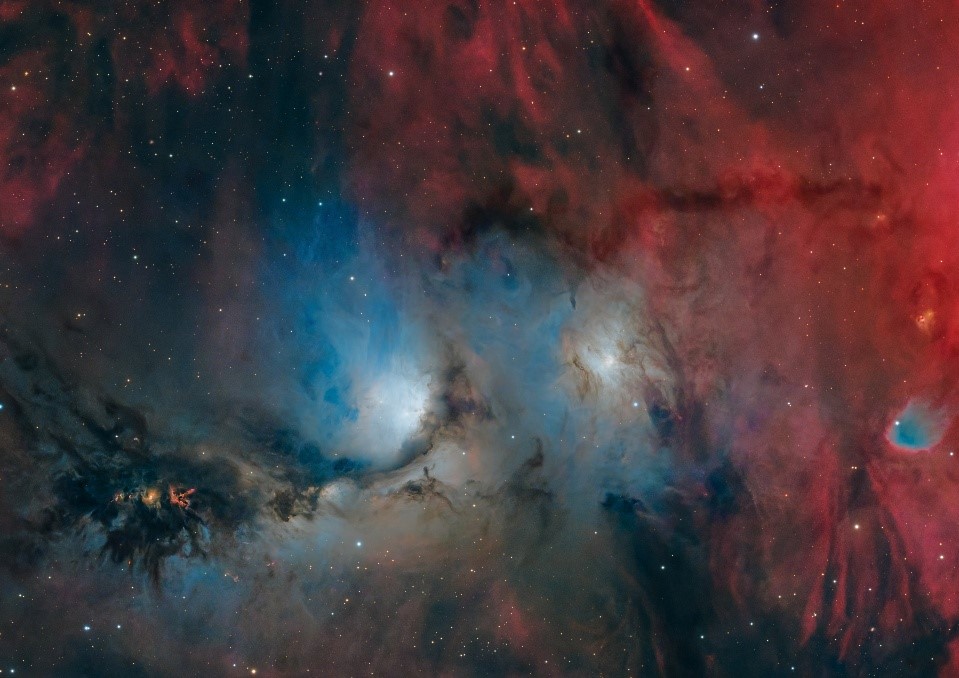
M78 – A Reflection Nebula in Orion
M78 holds a special place in the history of our remote imaging project, as it was the very first image captured after the system became operational in Spain. With a total integration time of 88 hours, it served as both a technical milestone and a proof of concept for the entire setup.
The image received a Top Pick award on AstroBin, marking a fitting first result under truly dark skies and confirming that the months of planning, testing, and installation had been worth the effort.
IC 5146 – The Cocoon Nebula in a River of Dust (Four-Panel Mosaic)
This image was one of the most challenging projects we have undertaken at the remote observatory. Composed as a four-panel mosaic, it required careful planning, precise framing, and a total integration time of 225 hours to reveal the delicate dust structures surrounding the Cocoon Nebula.
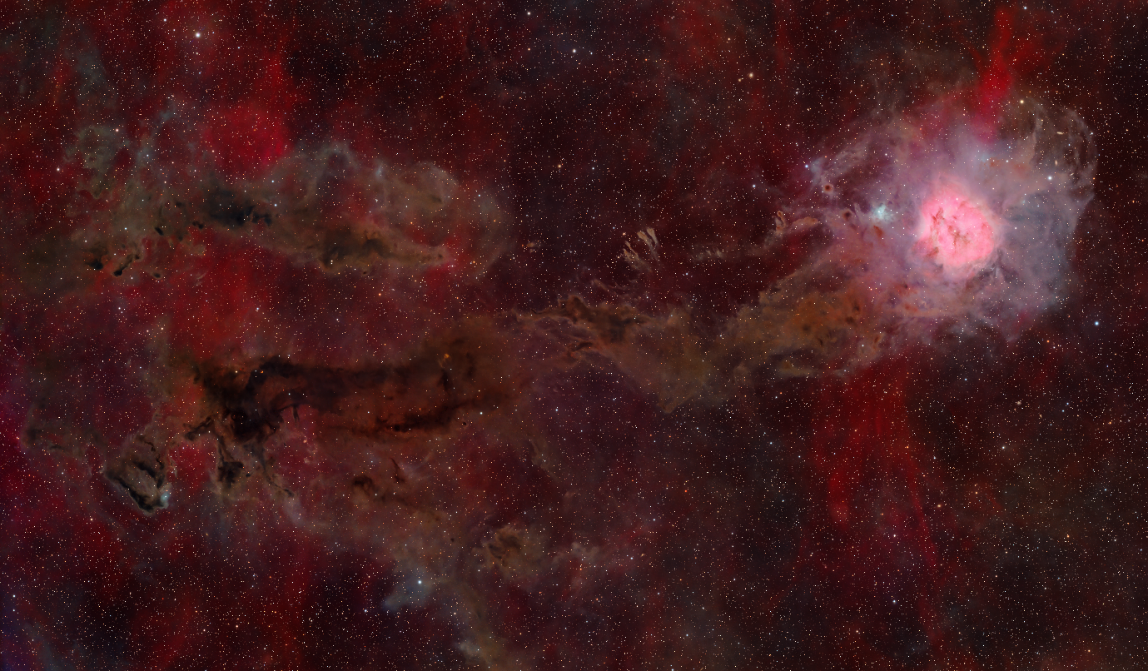
The final image received a Top Pick award on AstroBin and was published in Astronomy Now and BBC Sky at Night magazine. It was also recognised with an AAPOD award, reflecting both the technical complexity of the mosaic and the depth of detail captured.
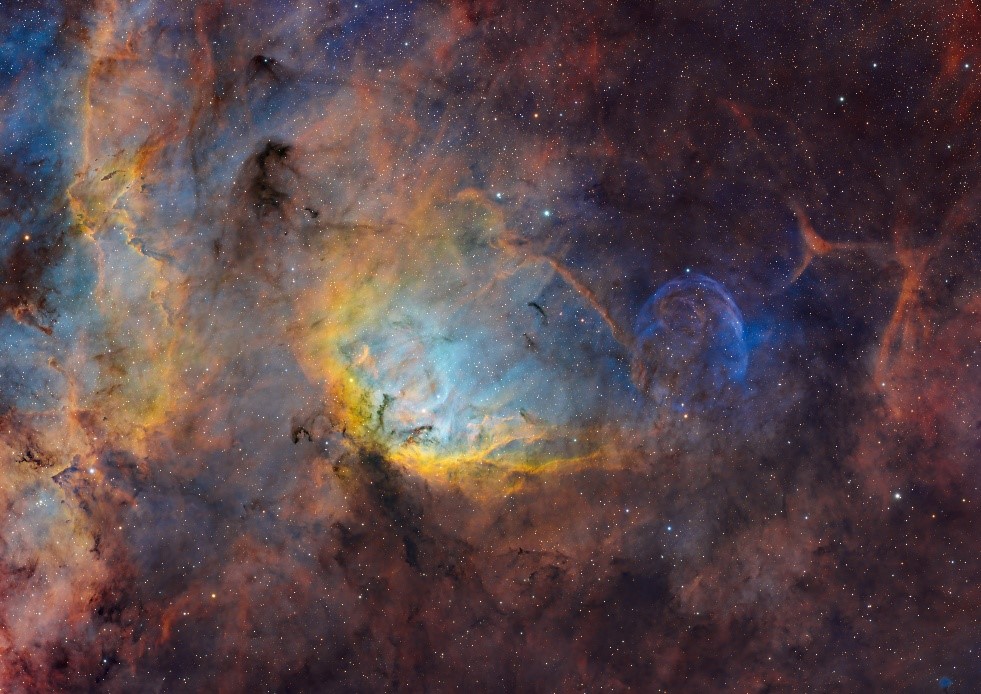
The Crescent and Soap Bubble Nebulae – Two Paths of Stellar Death
This image captures two very different outcomes of stellar evolution within the same field of view. Despite being one of our shorter integrations at 76 hours, the data was sufficient to reveal both the turbulent structure of the Crescent Nebula and the faint, delicate shell of the Soap Bubble Nebula.
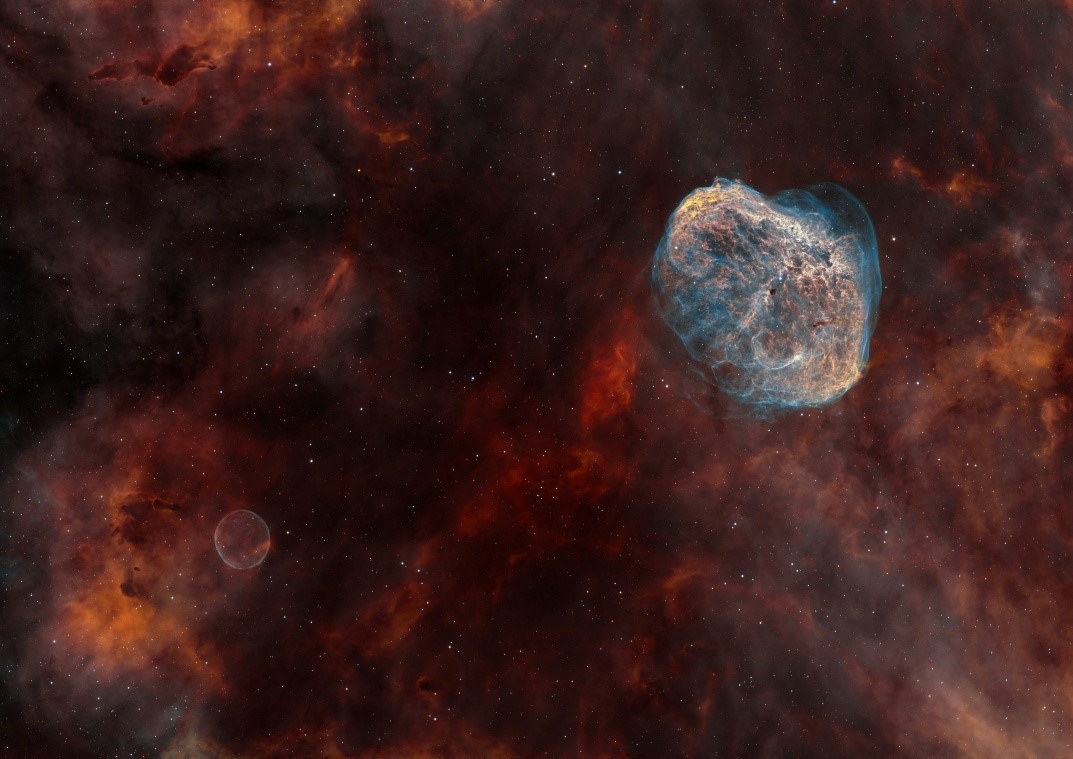
The image received a Top Pick award on AstroBin and was recognised with an AAPOD award, demonstrating that careful composition and dark skies can be just as important as sheer integration time.
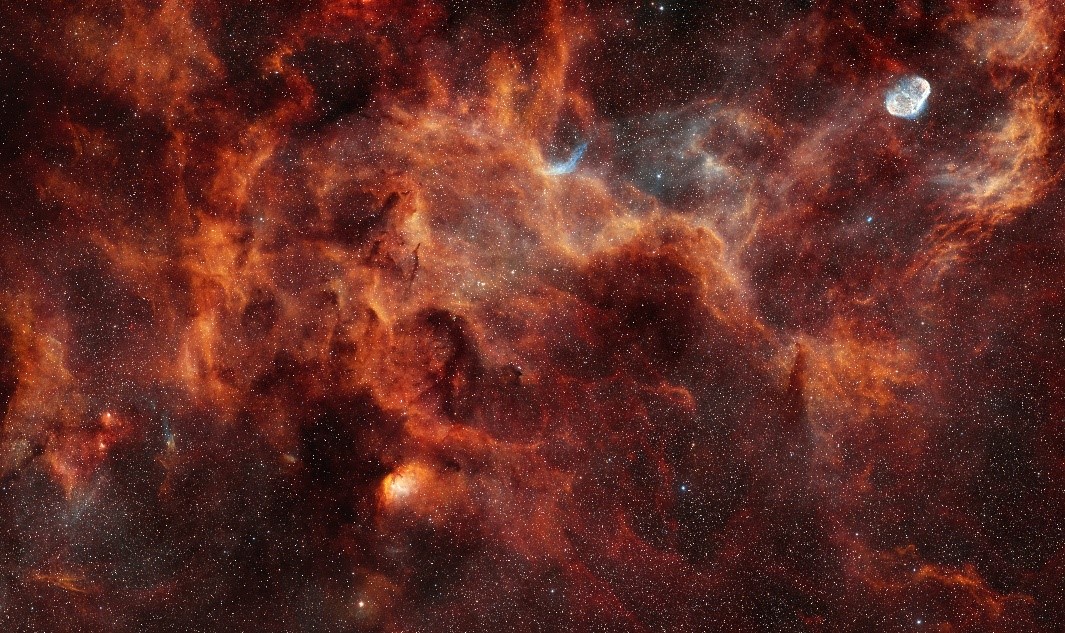
WR 134 – A Wolf–Rayet Star in Cygnus
This image focuses on WR 134, a Wolf–Rayet star embedded within the rich hydrogen clouds of Cygnus. Captured with a total integration time of 76 hours, it highlights the energetic stellar winds sculpting the surrounding nebula.
This was the second image produced using our HOO+S colour palette, allowing us to emphasise both the fine structural detail and the complex interactions between ionised gases in this region of the sky.
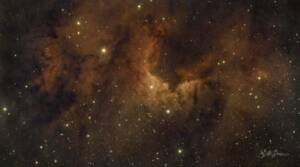
Cygnus Widefield – Captured with a 135 mm Lens
This widefield view of the Cygnus region was captured using a 135 mm lens alongside our primary imaging projects of the Crescent Nebula and WR 134. With an approximate total integration time of 50 hours, it reveals the vast network of emission and dust that defines this rich area of the Milky Way.
This image marks the first time the dataset has been publicly released, offering a broader context to the more tightly framed targets captured during the same imaging campaign.
The Tulip Nebula – Petals and Shockwaves
This image is Jamie’s interpretation of the Tulip Nebula, captured with a total integration time of 168 hours. The final composition combines SHO narrowband data with RGB stars, allowing both the fine internal structure and the surrounding shock fronts to be presented with clarity and depth.
The image received a Top Pick award on AstroBin, recognising the balance between technical execution and artistic interpretation.
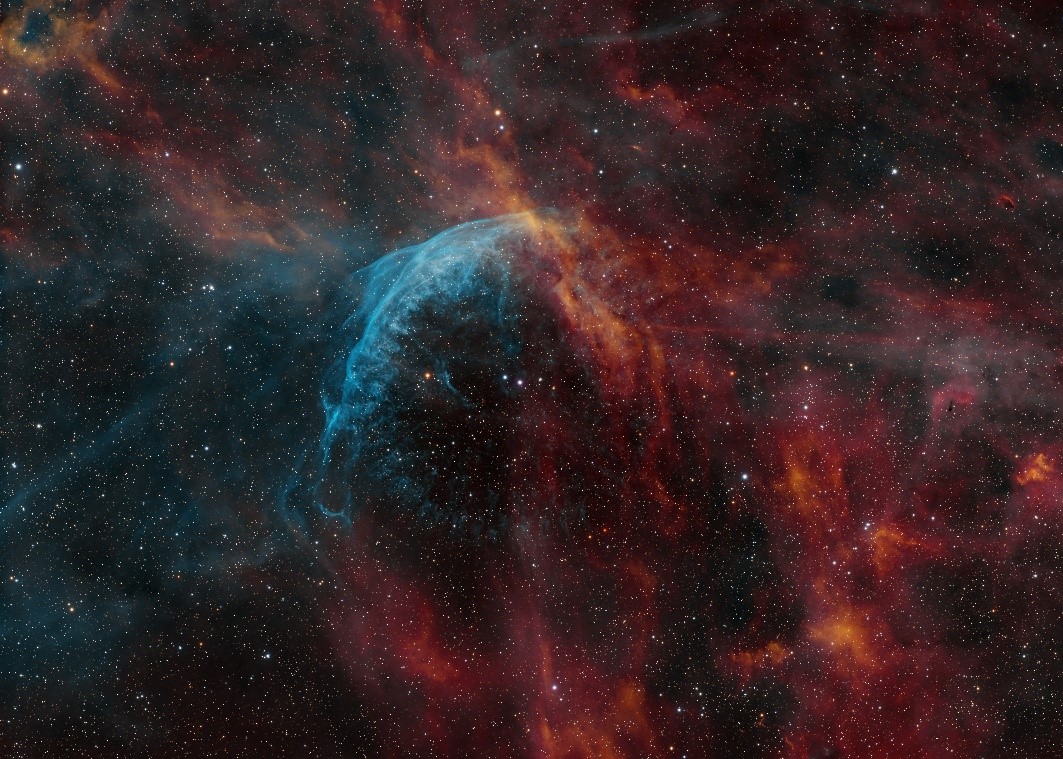
The Eastern Veil Nebula
One of our most recent projects, this image of the Eastern Veil Nebula was captured with a total integration time of 115 hours using our HOO+S colour palette. The extended exposure allowed us to resolve fine filamentary structure across the remnant, revealing both the delicate shock fronts and the complex internal detail of the nebula.
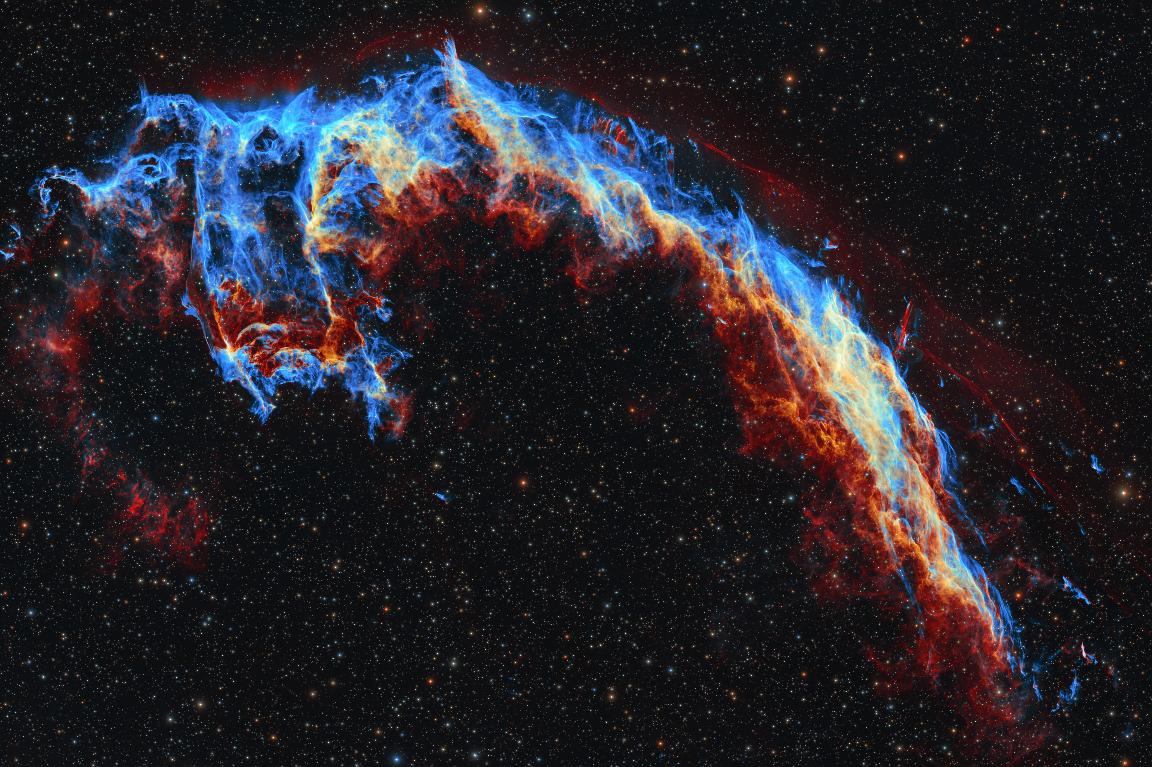
Within the context of our work to date, it stands out as one of the most detailed renditions of the Eastern Veil we have produced, reflecting both the benefits of long integration and the consistency of the remote system.