

Discovery of the M31 [OIII] emission arc
Recently, a major discovery by an international team of amateur astronomers and scientists has become a huge online hit, and this new discovery is just located in one of the
This tutorial teaches you how to connect the ASIAIR PRO to network, or how to connect the ASIAIR PRO box to the ASIAIR APP. They mean the same as ASIAIR PRO is controlled by the ASIAIR APP on your phone or tablet via network.

ASIAIR is an intelligent astronomy control system linked by Wi-Fi, which includes both hardware and software. Hardware is the well-known small box, software is the ASIAIR app, to remote control the astronomy camera, equatorial mounts, and many other related devices to take astrophotography.
ASIAIR App supports both iOS and Android platforms, running on smartphones, tablets, etc. We will call it ‘App’in the following text.
We will demonstrate 4 methods to connect to ASIAIR by using an iPhone.
There are two methods to connect with Wi-Fi. The first is the AP mode which we are familiar with, another is the station mode, which are available after firmware version 1.4.
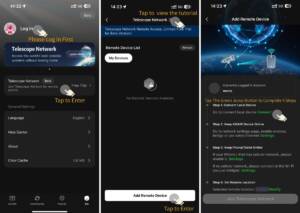
AP mode stands for access point mode, using the direct wireless connection broadcasted by ASIAIR PRO to the device. To use, first power on the ASIAIR PRO, and wait for 15 seconds, make sure the red PWR light is on, the green CARD light is flash, and “Wi-Fi” light is on. Using smartphone or tablet to connect the hotspot name similar as “ASIAIR_XXXXXXXX”, the default password is “12345678”, and tick “Keep Connection”, then open the ASIAir app.

When the following user interface appears, choose all the appropriate devices, and tune related settings, then click “ENTER”.

This is the most common and fundamental way to connect to ASIAIR PRO. Due to the limited coverage and easy to be interfered with obstacles of the Wi-Fi hotspot, your smartphone or tablets cannot be far from the ASIAIR PRO. To extend the coverage of the Wi-Fi hotspot, you may buy a Wi-Fi repeater, or choose another way to connect: Station Mode.
STA mode stands for station mode. The station mode could not only extend the Wi-Fi coverage, but also resolved an issue appear on only parts of Android phones: Those phones cannot access the Internet after connected to ASIAIR PRO.
Using station mode, and connect ASIAIR PRO to your Wi-Fi network, the wireless router will bridge your entire Wi-Fi network. You could control the ASIAIR PRO within the coverage of your Wi-Fi network, which obviously covers more area than a single Wi-Fi hotspot. And you could access the Internet at the same time.
Here is how to do it:
First connect ASIAIR PRO as the first method, then find “WiFi Station Mode” under ASIAIR PRO Settings and enable it.

Please be advised, the station mode only supports for 2.4GHz.

Then select the Wi-Fi network you want to be bridged and enter the password if necessary.

You have finished configuring station mode of ASIAIR PRO.
You can view IP Address and other network-related settings after you tap the “info” button in the rightmost.

In future sessions, just connect to your Wi-Fi network, open ASIAir app, and double confirm it, then tap “Next”. Now you are connected again!

Note: Some Android phones or tablets may require you to select the Wi-Fi network again.
After you configured station mode, when you open the app, the app will prompt “Reconnecting” when you are in the coverage of your entire Wi-Fi network.
And if you have multiple ASIAIR PROs in station mode, you do not need to go back to the first step, just tap “Switch Device” in “ASIAIR PRO Settings”, there will be a list for you to switch different ASIAIR PROs.


The device name in the list could also be renamed for better identification.
In real world, we strongly recommend you use station mode, which could connect your smartphone and tablets to your astronomy rig without coverage restriction. But sometime, the wireless network might not be reliable. At this time, you might try ethernet connection, which more reliable and have higher data throughput.
As the WiFi signal might not be very stable sometimes, you can also try the wired connection way to obtain higher-speed and more stable transmission effects.
Connect your ASIAIR PRO to the wireless router with an ethernet cable. Connect your smartphone or tablets to the wireless router. Open the app, you may see “Connected” after “Wired Ethernet” in “ASIAir Settings”.

Tap on “Connected” will display network details. IP Address might be useful if you want to transfer the images out from ASIAIR PRO.

ASIAIR PRO has a built-in Gigabit Ethernet port, which has better reliability and higher data throughput than a wireless connection.
A Portable Wi-Fi router only has a WAN port, which is also could be connected to ASIAIR PRO. You may set up router based on the instruction of router itself. The portable Wi-Fi router also capable for providing Wi-Fi connection in a small area. You could follow the “Method 3” instruction to set up the network. The “white box” in the following image is the portable Wi-Fi router.

| Connection Method | Advantage | Disadvantage | Scenario | |
| Using Wi-Fi | AP Mode | Easy and fast,
Both 2.4GHz and 5GHz supported |
Limited hotspot coverage | The phone/tablet close to Wi-Fi Hotspot |
| Station Mode | Can connect to the ASIAIR PRO box in the coverage of your entire Wi-Fi network | Only support 2.4GHz | The phone/tablet and astronomy rig could be covered by the same Wi-Fi network | |
| Using Ethernet | LAN Ports | Fast and reliable,
Gigabit network |
Limited by the length of the ethernet cable | The astronomy rig is near the router |
| Pocket WiFi Router | Combined with Ethernet and Wi-Fi, providing flexibility connection | You have to pay for it first | None |
All 4 methods have their own pros and cons. You may choose the most fitted ones.
Recently, a major discovery by an international team of amateur astronomers and scientists has become a huge online hit, and this new discovery is just located in one of the

From Seestar to Pro: Dominik Popławski’s Journey into Deep-Sky Imagin Hello. My name is Dominik Popławski. I live in Poland. I’m a painter and computer graphic designer. Astronomy has been
My name is Eric Wright and I’m a 39 year old Astro photographer and cybersecurity technician in the Cleveland, Ohio area (United States). I am the current Secretary for the
Some astrophotographers spend years searching for the perfect image. For Deqian Li, the journey began only in 2024—yet within a remarkably short time, several of his images have already been
Part 1: What’s New in ASIAIR V3.0 New Features Optimized & Fixed Telescope Network is now live No matter where you are, as long as your device is online, you

How It All Began Meet Benoit De Mulder(@ bigbenuniverse) , 52, and started visual astronomy at the age of 8. “For as long as I can remember, I’ve been fascinated
79 Comments
Yuntao Lu
I cannot connect ASIAir Pro to my home wifi network. My home wifi is using Net Gear Orbi mesh, I can find WiFi SSID from the list, when I input password, after several seconds, it said connect failed. I also tried to “disable” 5G network, but the issue is still the same.
Moson
You could try the wired connection way to obtain more stable transmission effects.
MikiSJ
Can this AIR be used on a laptop using the Windows 10 Pro O/S?
If so, then what is the speed of the LAN when connected via Ethernet?
Moson
Sorry the ASIAIR can not be used on a laptop, maybe you could install Android virtual machine on your laptop. And the speed of the LAN is depend on your home net and wire cable.
Chris
My home network has no password, the station connection will not allow me to continue without a password. How can I connect to a open wifi network with no password?
Moson
You could connect ASIAIR with your home network directly first, then choose the station connection. And you must click your open wifi network in the ASIAIR manually. After that, you need wait for a while. The ASIAIR PRO will connect to your open wifi network.
Torben
Hi I am having the same problem on my home wifi as Yuntao – I can see the network but it does not connect – is this something that can be fixed?
Katherine Tsai
Please try keeping close to ASIAIR device and Home wifi both.
Christian
i have the white box in the photos my network shows but it says that it can not conntect like my password is wrong or something.
It does show wired connected but my phone shows connected yo asair pro.
So im confused. In the wifi setting on the app it has the white box as saved. But when i choose to connect to it. It ask for a password then it fails all the time.
Katherine Tsai
Please keep closer to your ASIAIR device and try again, if the problem not solved, you can send us an email to support@zwoptical.com
Gerald
If i use your 64 GB thumb drive I dont have the ports I need to operate. I need one main camera one to guide one to focus one for mount. So what would you recommend I have a Pegusus box pro do you recmmend it to be used?
Katherine Tsai
You can add a hub or use the USB2.0 hub on cool camera.
Karian
Hi.
I can’t use internet when I use ASIAir Pro by android phone.
I changed my phone’s IP settings from DHCP to static but it has no effect.
How can I use internet when I using ASIAir Pro?
ZWO.Moson
You can connect your ASIAIR PRO to your family internet, change the connection mode in the ASIAIR app to Station mode.
Rayschilke
Is it possible to connect my laptop to the asiair pro so I can see my larger sceen?
ZWO.Moson
Sorry the ASIAIR PRO can not connect laptop. You can use the ASIAIR PRO via iPad.
Filipe
If I bought an ASIair I could be happy with using it to setup and control some sessions using an iPad provided I could at other times feed the connected cameras through to a PC via the WiFi or wired Ethernet. In this mode it would act as a camera hub. The icing on the cake would be to have the LiveStacking available as a video stream. Being able to view images on a large high resolution monitor is important.
Phil
ZWO.Moson
I will convey your feedback to our devs, and they will consider this.
Mike
I connect to AAP with my 10″ Galaxy Tab A tablet. The tablet has the ability to cast its screen to any smart TV. Now, we can sit in our living room and watch the proceedings on our 55″ flat screen smart TV. Cool!
Stuart
Yes you can do this is Download an Android Emulation like BlueStack . On the BlueStack application Download ASI AIR Mobile App. Good Luck .
I am trying to Get 3 ASI AIR Pros to Connect to home Network. This way I can Control Three Telescopes No luck yet
Nestor
Yes, just download NOX android emulator then install ASIAIR app in it. Works great faster longer range than a tablet.
NP
Can You change the default wifi password on the ASIAIR PRO ?
I can see this can be an issue at star parties if there are other ASIAIR units near by.
ZWO.Moson
Sorry the wifi password can not be changed.
Johnie
Is it possible in the future to have also 5Gh support in Station Mode?
ZWO.Moson
Sorry it is impossible to develop the 5Gh in Station Mode due to the hardware limitation of raspberry pi4.
Bobby
When I put the the device into Station Mode it keeps auto reconnecting all the time. I have tried to put the unit in 2.4ghz but on auto reconnect it switches it back to 5ghz. Then keeps auto reconnecting.
Support@ZWO
Please upload the log in APP Feedback for us to analyze.
Georg Nyman
I use the pocket router as shown in your photos. It works fine, but I had to place it in such way, that it stays unobstructed by the mount and /or telescope. Like that, I get good signal strength for all scope positions. WIFI signal of the ASIAIR Pro is too weak to bridge the distance from my scope position in my garden to my living room (about 15m).
ZWO.Moson
You can also try to use Ethernet.
Markus
I have a Celestron AVX and Skylink Module. Is it possible to connect the mount via WiFi (via the Skylink) to the ASIAIR Pro? Perfect would be station mode, WiFi to mount and SkySafari on iPad.
ZWO.Moson
Sorry we haven’t test this connect way before. We suggest you use hand control and USB cable.
Pamela
Hi, is it possible to use ASIAIR PRO with my phone in the middle of the dessert, no wifi connection?
ZWO.Moson
Yes, it does not require network when connect the ASIAIR PRO to your phone.
Don
I second that request. I have all asi cameras and two eaf but would hate to be restricted to
a tablet interface 100% of the time. Love your products but this limitation is a deal killer
Don Singer
Portland, OR
ZWO.Moson
You can leave away from the ASIAIR app when you start the auto run.
Terry D.
I am able to connect to the ASIAIR PRO through direct ethernet connection and through station mode, but I can not connect directly through AP mode.
I’m using an iPhone 7 with latest software. My phone connects to the wifi network, but when I run the app it cannot find the network.
I have tried to reset but it does not fix the issue. How do I fix this AP connecting issue?
Thanks.
ZWO.Moson
At the top of the page after opening the app, can you see a prompt “NO ASIAIR Detected”?
You can join our ASIAIR facebook group: https://www.facebook.com/groups/ASIAIR/
William
I am ready to purchase an ASIAIR, and a ZWO ASI 385 MC.
My home has 3 WIFI networks on 2.5 and 5 Ghz bands. I wish to connect with multiple Android tablets, meaning 2 at the same time. 1 for controlling the scope, and cameras, and a larger 18″ Samsung Galaxy View 2, just for previewing images (EAA), indoors during colder weather. Just want to know if this is possible.
SECONDLY. The Galaxy View 2 currently runs Android 8.1. Google Play will not allow me to install the ASIAIR app. I went thru this years ago with my Galaxy View 1. It was a matter of catching up to the devices from Google. My View 2 runs Sky Safari Pro V6 effortlessly. Is there another method to install the ASIAIR app into the Galaxy View 2? A bigger screen is by far better!
sara.liu
Hi William,
1. AIR allows two devices to be connected, but does not provide simultaneous operation of two devices. One device is enough, it can be controlled and previewed.
2. GooglePlay has restrictions on the installation of software. There are many restrictions, such as region (for example, prohibited in China), device hardware (devices with non-general Android systems), software version (over-old system version), age (minor) Protection) and so on.
At present, the distribution area of our APP is: global, the age limit of Google account is: 3 years old +, and the supported system version is: 5.0 and above.
If it is a popular model and the network status is normal, there should be no problem with the installation. If there is problem, please download the APP on our English official website .
John holmes
Right hope someone can help I just got a new ioptron cem26 with built in WiFi as well as a hand control
Now how do I connect it to the asiair pro which telescope mount do I pick? Anyone please!!!
Support@ZWO
Please try hand control first.
배소한
Hi.
Can ‘Airpro’ power ‘eaf’ and ‘294mc pro’ and ‘120mm mini’ simultaneously?
Support@ZWO
We recommend a 12-15V 2-6A power supply. ASIAIR PRO uses 2A while working alone, and the power supply should be able to power all device that connects to ASIAIR PRO.
Allen
New, just bought the ASIair Pro. Air pro will not connect through Wi-Fi. Used LAN to connect, it worked. Firmware update loaded but will not install, “Installing Firmware Failed”. I rebooted and started all over again. No Wi-Fi, and will not install firmware.
Now my tablet is communicating with it, but the LAN to air pro is needed.
Support@ZWO
https://astronomy-imaging-camera.com/manuals/How_to_Restore_ASIAIR_OS.pdf
James Goodall
Okay, I really like the ASIAIR Pro!
I have an important request. When I’m imaging with my fast f2 HyperStar 11″ Edge the guiding dither and settling eats up way too much time! I have an iOpton CEM60 EC which is a really good tracking mount and it’s adjusted nicely, but it always overshoots a time or two (occillates) when re-acquiring stable guiding so I’m wasting very precious imaging time. Otherwise my guiding is great with that mount, it’s just the settle time. I probably don’t even need to guide because because of the short exposures, but then I can’t Dither which is super important!
Can you at least offer a dither setting without the guiding feature for fast scopes and good mounts?
Another better (but perhaps more challenging) solution perhaps is to drop the guide exposures just for dithering and star re-acquisition from every 3 seconds (or so) to perhaps .5 – 1 second. Then of course go back to the 3 second guiding on the guide star imaging, but the camera gain would certainly need to be dropped at the same time or the star would be grossly over saturated…changing the guiding aggressiveness messes with my normal guiding too much causing overshooting then.
Thanks for the amazing ASIAIR and keep up the helpful programming!
Support@ZWO
Hello james
Thanks for the feedback
We will convey this to our R&D
frankie
How can I get the ASIAIR Pro to save pictures in 16 or 32 bit? They seem to only be saved in 8Bit. I am using the ZWO533 MC camera. Also, after downloading the pictures, they are as tiny as can be. Is this because of the 8Bit?
thanks for your help
Support@ZWO
Hello
The fits file saved 16bit
the video (avi)saved 8 bit
saturnobservatory
Hi, this is the first time I use my ASI294MC with the ASIAIR Pro and while imaging I found the screen full of RGB noise!! What could be the reason? Do i need to change any setting in the ASIAIR Pro? I’m using this camera for the last one year and never faced this issue with any imaging software
Support@ZWO
Please take screenshot and send to support@zwoptical.com
Nikolay
When can we finally get support for our existing focusers like Moonlite etc.? I see the same question has been asked for years by other users. I am sure ZWO will sell a lot more ASIAIR units if other focusers are supported.
Support@ZWO
There is no such plan. Please buy ZWO EAF.
Dany
I can connect with the ap mode but, when I try to connect to my wifi with station mode it doesn’t behaves as explained in the article. After I inserted the Wi-Fi password it lost connection e wasn’t able to pass the password to asi air pro. After sever times closing the app and do it again it seems to save the network but when I go out of range of the asi air pro it lost connection . If I connect to the Wi-Fi the app doesn’t see the asi air pro… I’ve tried all day long. Can you help me?
Support@ZWO
What is your mount? Please send mail to support@zwoptical.com and we can send you some instruction.
Mike
Will the asiair pro ever get an update for the Meade lx85 mount?
Support@ZWO
Meade lx85 is supported.You can choose “Meade LX200 Classic” or “Meade LX90/200/600/850 ACF/GPS”.
Marcel
I decided not to buy Asiair pro because of the many reported issues with WiFi. I will wait for the final resolution of the wifi problems and also the addition of the Bleutooth capacity. thank you
Support@ZWO
Hello
why did you need the Bluetooth?
Phil
Hello,
I was reading that the AsiAir can connect to two devices.(Phones/Tablets) What would that entail? Would one device act as the ‘system operator’ with all the controls while the other device works as a ‘viewer’?
Thanks,
Phil
Support@ZWO
Sorry to tell you that you can’t operate like this.
Zummerzet_Leveller
Is it possible to change the wifi channel on the ASIAIR Pro? Mine is on Channel 11 and conflicts with other wifi signals in the area.
Support@ZWO
Channel 11 is default and can’t be changed.
Greg
I love the idea of the station mode, but I can’t seem to get it to work. It asks me to enter my WiFi password, but rejects it every single time. I tested my password by disconnecting my phone from the WiFi, then reconnecting using the same password and it works. I suspect that there’s either a bug, or it’s only capable of a specific network encryption type. Does anyone know which specific network encryption type(s) it supports? Also, it doesn’t seem to have an antenna, I am wondering if one can be added, or what is the max distance it can be from the router. I’m having similar issues with the station mode on my Star Adventurer Pro, and there doesn’t seem to be much troubleshooting guides yet.
sara.liu
Please separate SSID for 2.4 and 5ghz, connect the 2.4ghz.
pom
Can celestron astro fi connect to wifi with zwo asi air pro? If zwo asi air pro can do .how to do it?
sara.liu
Can be connected via ST4 port, but can only be used as a guide.
You can refer to this video https://www.youtube.com/watch?v=haQj-kiE5ec (connect XTron AVX equatorial mount and SkySafari)
Cuende
Is it possible to connect an adaptador Wifi USB to ASIAIR PRO to solve communication coverage problems? Like BrosTrend 650Mbps Linux Adaptador WiFi USB or similar.
sara.liu
Yes, it is possible.
We have the ZWO WiFi Extender, please click the link to get it:https://astronomy-imaging-camera.com/product/zwo-wifi-extender
Alessandro Galdiero
Sarebbe possibile ricevere un manuale con la spiegazione di come si usa asiair tutte le funzionalità.Grazie
sara.liu
Please refer to this link, you can learn the ASIAIR from it:https://www.yuque.com/zwopkb/asiair
piotr.kryger
Hi
I would like to ask if asiair pro or plus has an option to connect to the mount via bluetooth?
sara.liu
No, we will consider your request.
juan gonzalez
Como puedo transmitir por redes sociales la aplicacion de AsiAir como por ejemplo en un facebook live¿?
sara.liu
I think this software will be helpful.
https://obsproject.com/zh-tw
Candice
Can you use the asiair for observation?
sara.liu
ASIAIR PRO is a smart WiFi device.
Gerald J Dubesa
I can connect in AP mode using my iPhone, but I cannot connect in AP mode using my iPad. I did not purchase cellular data with my iPad. Do you need cellular data on the iPad to connect in AP mode?
Jerry
sara.liu
Please contact support@zwoptical.com directly.